Elements
Elements for lecturers and participants
Text box
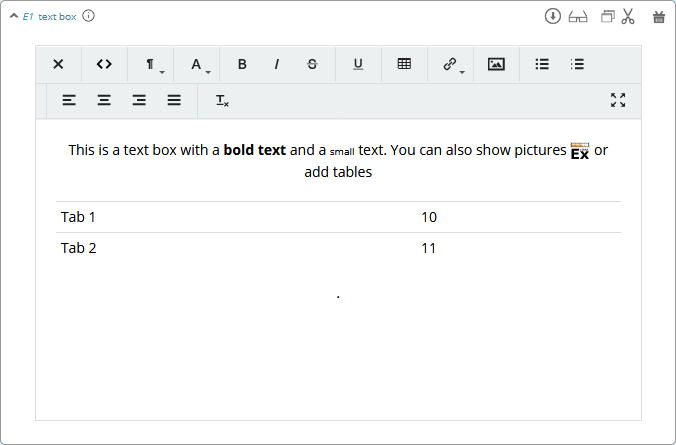

The text box is the simplest element. The entered text will be displayed to the participants or a the lecturer’s screen, depending on where you place the element. The text box is equipped with a WYSIWYG editor, which allows you to insert tables, symbols, etc. If you double-click into the text element, the WYSIWYG editor opens (see left figure). You can switch back to the normal text box by clicking on the <> symbol (see right figure).
If you are not in the WYSIWG editor, you can use standard HTML to design your texts. You can do, e.g. the following:
This is a text box with a <b>bold text</b> and a <span style="font-size: x-small;">small</span> text.

You can also show pictures <img src="https://classex.uni-passau.de/bin/pic/logo.svg" style="width: 20px">
or add tables <br><br>

<table class="table table-hover"><tbody>
        <tr><td>Tab 1</td><td>10</td></tr>
        <tr><td>Tab 2</td><td>11</td></tr>
</tbody></table>.
Special Characters
Special |
Name |
Function Example |
|---|---|---|
role1.png |
Symbol Role 1 |
Red participant symbol |
role2.png |
Symbol Role 2 |
Green participant symbol |
$variable; |
Variables |
Besides normal text, you can also insert variables into the text box. |


If you have defined variables (see Programming), you can have these displayed by inserting the character “$”, the variable name followed by “;”. Make sure not to forget the “;” at the end! Variables and normal text can be combined.
Make sure that role1.png, role2.png,… are followed by a space. Otherwise, the figure will not be replaced.
Conditional text
So far, we have only tackled how to read the PHP variables and display them in the text field (e.g. $variable;), but sometimes we would like to display conditional text. For example, we might have a variable that tells whether a participant is a buyer or seller. We can achieve this task by a program element where you define:
if ($isBuyer) $buyerText="You are buyer"; else $buyerText="You are seller";
Then you can enter and output $buyerText; in the text box.
Display formulas
Although classEx does not directly support LaTeX, it is possible to display formulas to participants in a more elegant way in a text box with MathML. It is best to use the NON WYSIWYG editor in the text box. Switching to the WYSIWYG version already translates your HTML code into the formula.
An example - the following HTML code leads to the following formula:
- <math xmlns=”http://www.w3.org/1998/Math/MathML”>
<mi>a</mi> <msup>
<mi>x</mi> <mn>2</mn>
</msup> <mo>+</mo> <mi>b</mi> <mi>x</mi> <mo>+</mo> <mi>c</mi>
</math>

It is also possible to display symbols and indices like in this example:
- <math xmlns=”http://www.w3.org/1998/Math/MathML”>
<msub><mi>π</mi><mn>i</mn></msub>
</math>
This appears like this in classEx:

You can find an overview with different tutorials here: https://www.w3.org/Math/#learn
In case your browser does not directly support MathML, here is a tutorial on how to work with it nevertheless: https://developer.mozilla.org/en-US/docs/Web/MathML/Authoring
Element Reference

In order to avoid redundancies, you can reference elements and add them in a different place in the game (instead of copying them directly). This place has to be after or at the same stage as the original element. For this, you can use the reference element. If the original element is altered, the reference is adapted automatically. The reference is created by selecting the stage number and the element number you are referring to.
Note
For example, if you require the same text in two stages, an element reference is a far more elegant version than a simple copy because any changes to the original element are adopted automatically. Also, a reference object in a participant field can just link to another participant object (the same principle holds for the lecturer fields).
Note
Please notice that the display condition is not taken from the referenced element but from the reference itself.
Warning
If you change the order of referenced elements, the reference does not automatically adapt, but has to be changed manually.
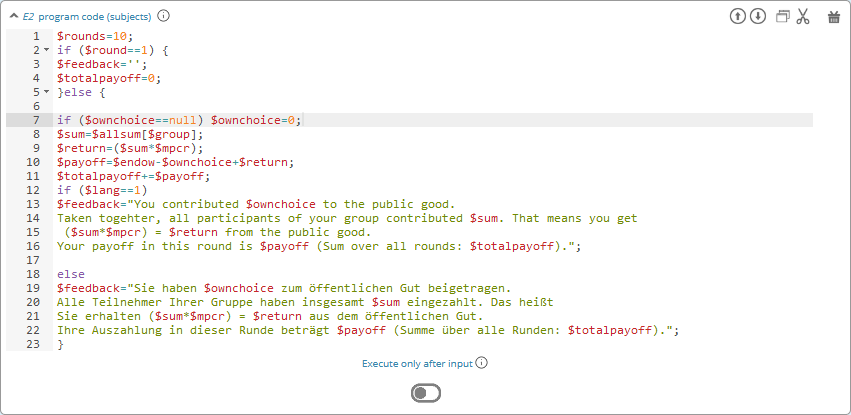
Program code
Program snippets can be implemented to calculate results for each subject. For further information, see Programming.
Note
Program elements for the participant are always executed before all other elements.
Elements for participants
Input element
In this element, you can insert several input fields. These are numbered #1, #2,… You can add input fields by clicking on add new input field. The input fields are displayed one after another. Input elements always provide a submit button automatically. In the following, the different types of input fields are described in more detail.
The following settings are available for every input field:
- type of input field
The type of input specifies how the input should be taken by the input field, like numeric input, discrete choice, sliders, …
- variable name
The variable name is the identifier of the decision input. The variable is automatically stored in the subjects table. The variable name can then be used in programs. For example, if your variable is called $e, you can access it by writing “$e;” in a text box or use
$ein a program element.
Furthermore, you can delete an input field by clicking on  or provide a display condition by clicking on
  . Display conditions are defined in the same way as for elements (see Handling elements).
Warning
Please notice that only one input element is allowed per stage. For several inputs, add additional input fields to the first input element.
Note
In all input fields, you can also use variables instead of numbers or text. This can e.g. be useful if you want to set a maximum depending on a variable $x. Just enter $x; in the maximum field. This holds true for other fields as well.
Numeric input field
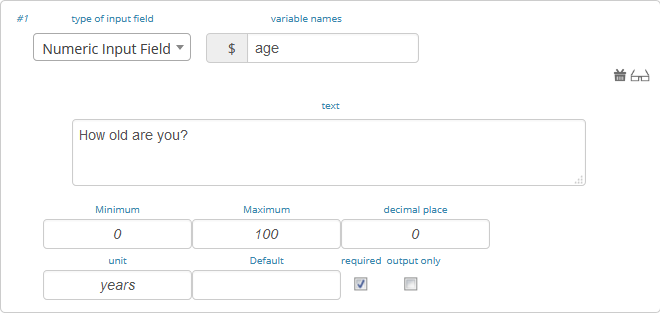
The numeric input stores the numeric input by participants and provides a basic check (minimum, maximum). It automatically rounds the input to a given decimal place and allows for input of digits with as 2.34 or 2,34. classEx also automatically changes the input to numeric on mobile devices and shows the correct keyboard.
- text
The text is displayed on top of the input field.
- minimum
The minimum specifies the minimal value. If the participant enters a value below the minimum, a warning is displayed, and he or she cannot proceed.
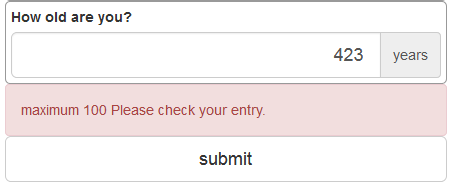
- maximum
The maximum specifies the maximum value. If the participant enters a value above the maximum, a warning is displayed, and he or she cannot proceed (see figure).
- decimal place
The number of decimal places. classEx automatically rounds accordingly.
- unit
A unit (e.g. %, €, mm, …) can be specified that will be displayed on the right of the input field (here “years”).
- default
A default value that is displayed to participants at the start.
- required
This determines whether input is mandatory. In this case, participants cannot proceed without entering a value.
- output only
This means that the field is read-only. Still, the value of the field is stored as a normal variable. It can, e.g. be used to provide Live feedback on input with JavaScript.
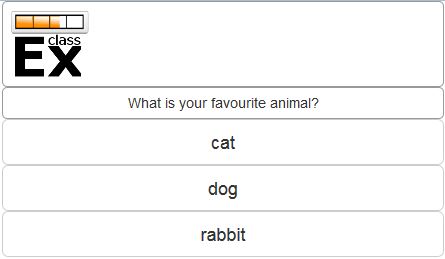
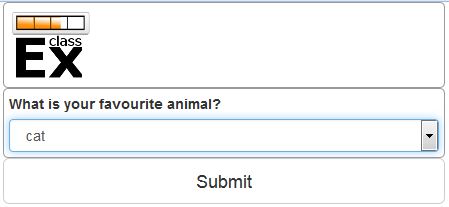
Buttons, simple list and drop list (single choice)
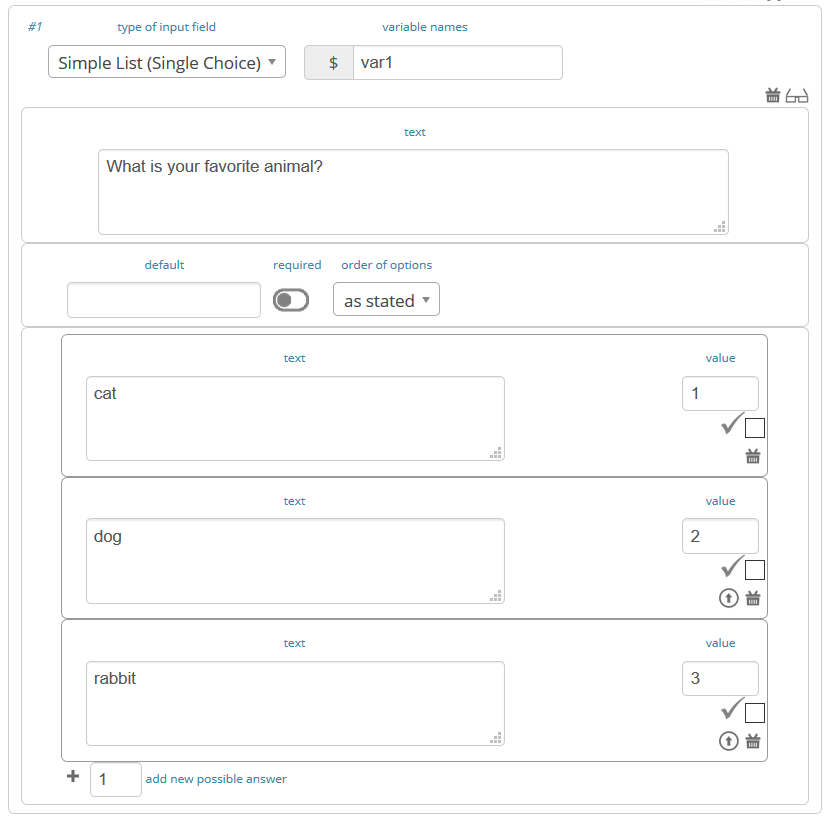
Those three types of input fields are used for discrete decisions. You can implement single-choice questions using buttons (first figure below), simple lists (second figure) or drop lists (third figure). This is what they look like in the participants’ display. The settings are the same for these input fields.

- text
The text is displayed on top of the input field.
- default
The default value is pre-marked at the start. For buttons, it is highlighted with a colour. For drop lists, it is preselected.
- required
This determines whether input is mandatory. In this case, participants cannot proceed before making a choice. For button input, you can set that only the correct answer allows proceeding.
- order of options
The order of options can be set to as stated or to random. In the latter case, the random order is determined separately for each participant.
- options
Options can be defined in the lower area of the element. Participants make a decision by choosing one of the options. The order of options can be altered by clicking on the arrow. You can also delete or add options.
Options come with a displayed text and a value. The value is stored in the data and as a variable.
You can mark the correct answer by clicking on the symbol
 . In this case, if you use the single/multiple choice result element for the lecturer, the correct answer is marked there.
Checkboxes (multiple choice)
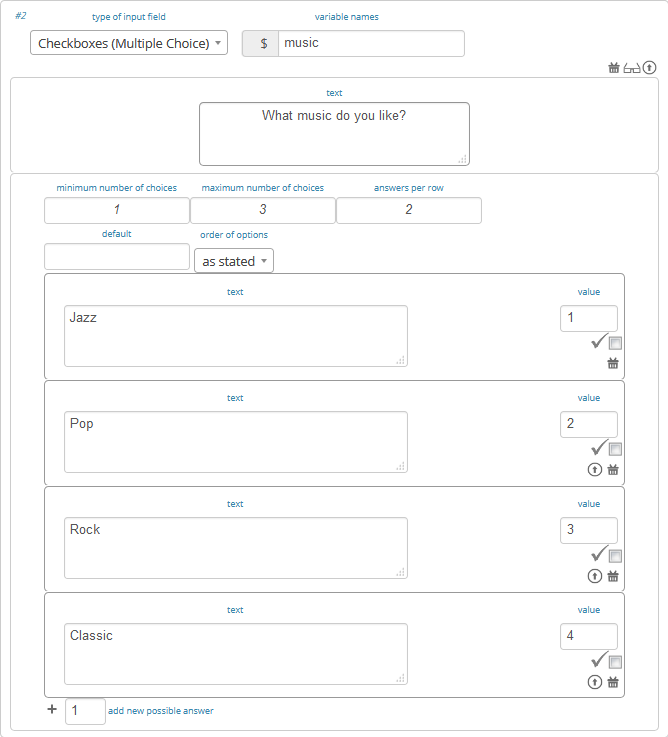
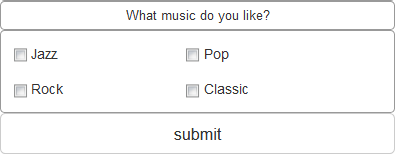
Choosing multiple options is possible by using checkboxes. Checkboxes work in exactly the same way as single-choice options shown above. Only the form of display is slightly different, as these are displayed as a list from which participants can pick several options. This way, multiple inputs can occur in one stage. In addition to the single choice, you can specify the following settings:
- minimum and maximum number of choices and
This restricts how many options can be picked by the participant.
- number of answers per row
This states how many options are displayed in each row (here, 2).
Important
Multiple choice inputs are stored separated with _, e.g. 2_3 if options with values 2 and 3 were selected. If you specify a default, please specify it accordingly.
Radioline
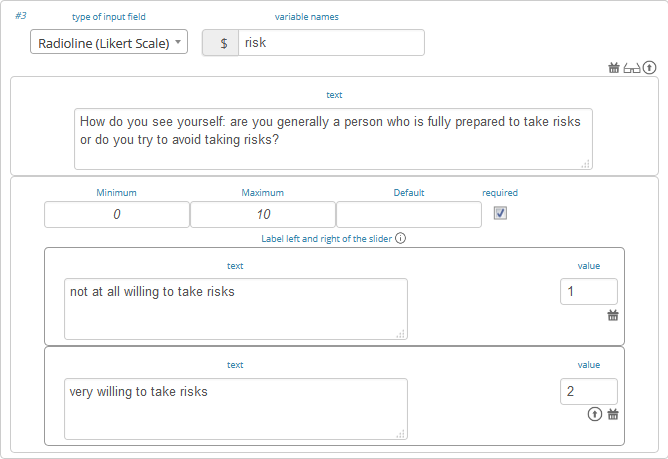
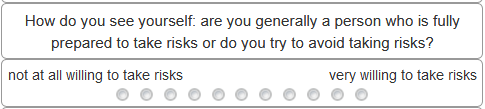
Radiolines, like Likert scales, offer stepwise input. The Settings are
- minimum and maximum
The first bullet of the slider is the minimum value, and the last is the maximum value. For each bullet, the value increases by one. In the example, a minimum of 0 and a maximum of 10 give 11 input possibilities.
- default
The default value is pre-marked at the start.
- required
This determines whether input is mandatory. In this case, participants cannot proceed before making a choice.
- label options
You can show all labels, which are then shown with rotated text below the radioline. Or you can show only the right and left labels. If you choose this option, intermediate labels are ignored.
- Label of the radioline values
You can add labels to each value of the radioline. Make sure that you specify the correct value.
Important
The labels are only shown if you specify the correct value. E.g. if the radioline goes from 0 to 10 and you want a label at the very left, it has to have the value 0. If you choose the option to show only min/max labels, intermediate labels are ignored.
Slider
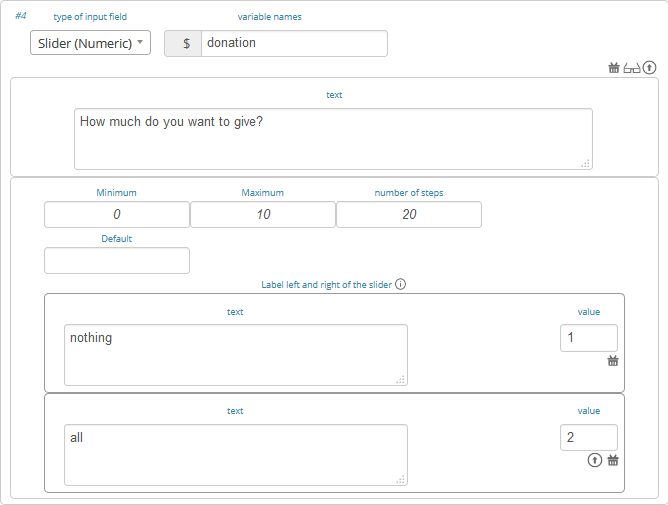

Sliders are a similar concept to radiolines. In this form of input, the participant moves a slider along a bar of predetermined positions.
- minimum and maximum
The minimum and maximum determine the range of the slider.
- number of steps
The number of steps determines how many positions the slider can be moved. In the example, 20 steps between 0 and 10 mean that each step increases by 0.5.
- default
The default value is pre-marked at the start. If no default is set, the slider is positioned in the middle of the range.
- label left and right of the slider
You can add a label on the left and the right of the slider.
Text input

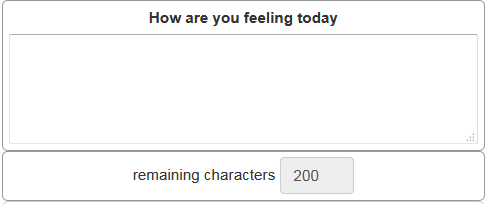
Text input fields allow participants to enter text. If a maximum is specified, it shows the number of remaining characters.
- minimum and maximum number of characters
This limits the number of characters which can be written by participants.
- default
The default value is written in the text input field.
- number of rows
This determines the height of the text input field.
Other input fields
There are other input fields available (urn, infotext, mean of all input fields). Those are outdated and should only be used with care.
The contract input field is also outdated. Please use the Contract element instead.
Additional settings

At the bottom of each input element, you can find additional settings which open by clicking on additional settings.
- button label
Here you can specify the label of the button. The default is “Submit”. This button label is only used if there is an own button for submitting your decision. E.g. in Buttons (single choice), buttons are labelled with the possible answers the editor inserted.
- confirmation message
If you enter a text here, participants are asked for confirmation before submitting. E.g. you can enter “Are you sure?” which is then displayed together with an OK button to participants.
- hide decision after submitting
After submitting, participants see a confirmation message and their input. If you switch this setting on, the input is not displayed anymore after submitting.
- directly to next stage
Normally, participants are moved to the next stage by the experimenter (see Start button and automatic start). If participants play individually and this setting is switched on, they move autonomously to the next stage. In this case, you have to select no forwarding if you use an automatic start.
- show button later
The appearance of the buttons can be delayed, e.g. if you want participants not to click too fast.
- allow resending the input
The input is not blocked after sending, but inputs can be resubmitted as long as the stage is active.
- space between input fields (px)
This allows you to add a certain space in pixels between input fields.
- highlight button
The send button can be highlighted in blue.
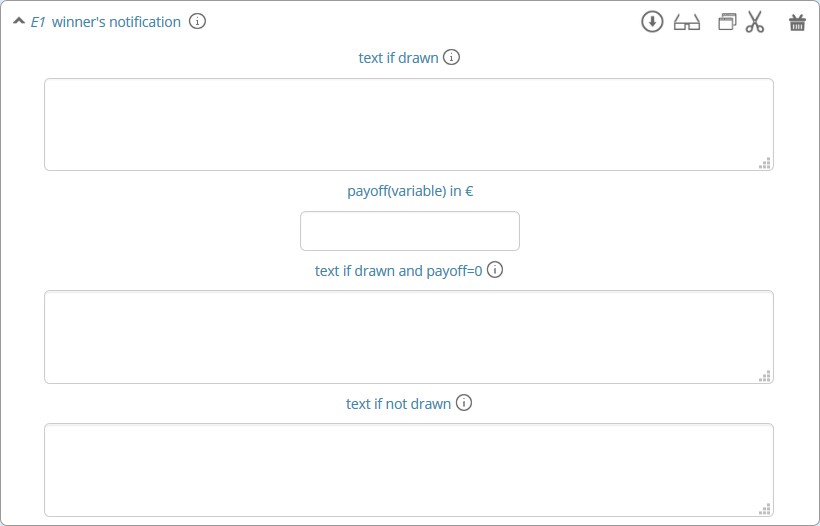
Winner’s Notification
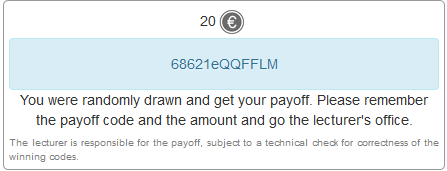
If a game is played with real payoffs, this element displays the payoff code to participants and the respective payoff. The payoff can be a number or also text (e.g. two tickets for the theater). The element automatically provides a legal disclaimer. The payoff notice can be changed. Also, the currency of the payoff can be changed under `course data`_.
A winning notification is necessary for games with monetary payoff. The participants who are randomly drawn receive a winning notification as well as a code to cash in their earnings.
- payoff(variable) in €
The amount of earnings can be determined by this setting. You can enter a fixed amount or a variable that is calculated beforehand. If, for example, the variable
$payoffis calculated in a program during the game, you can enter$payoff;in the earnings field.- text if drawn
The default text is: You were randomly drawn and get your payoff. Please remember the payoff code and the amount, and go to the lecturer’s office.
- text if not drawn
The default text is: You were not randomly drawn to be paid out.
- text if drawn and payoff = 0
The default text is: You were randomly drawn, but your payoff is X. It is therefore not paid out.
Important
The winning notification can only be displayed if you also define a Winner’s draw on the lecturer side. Otherwise, no winner can be determined. Winners are always drawn with a lecturer element.
Contract
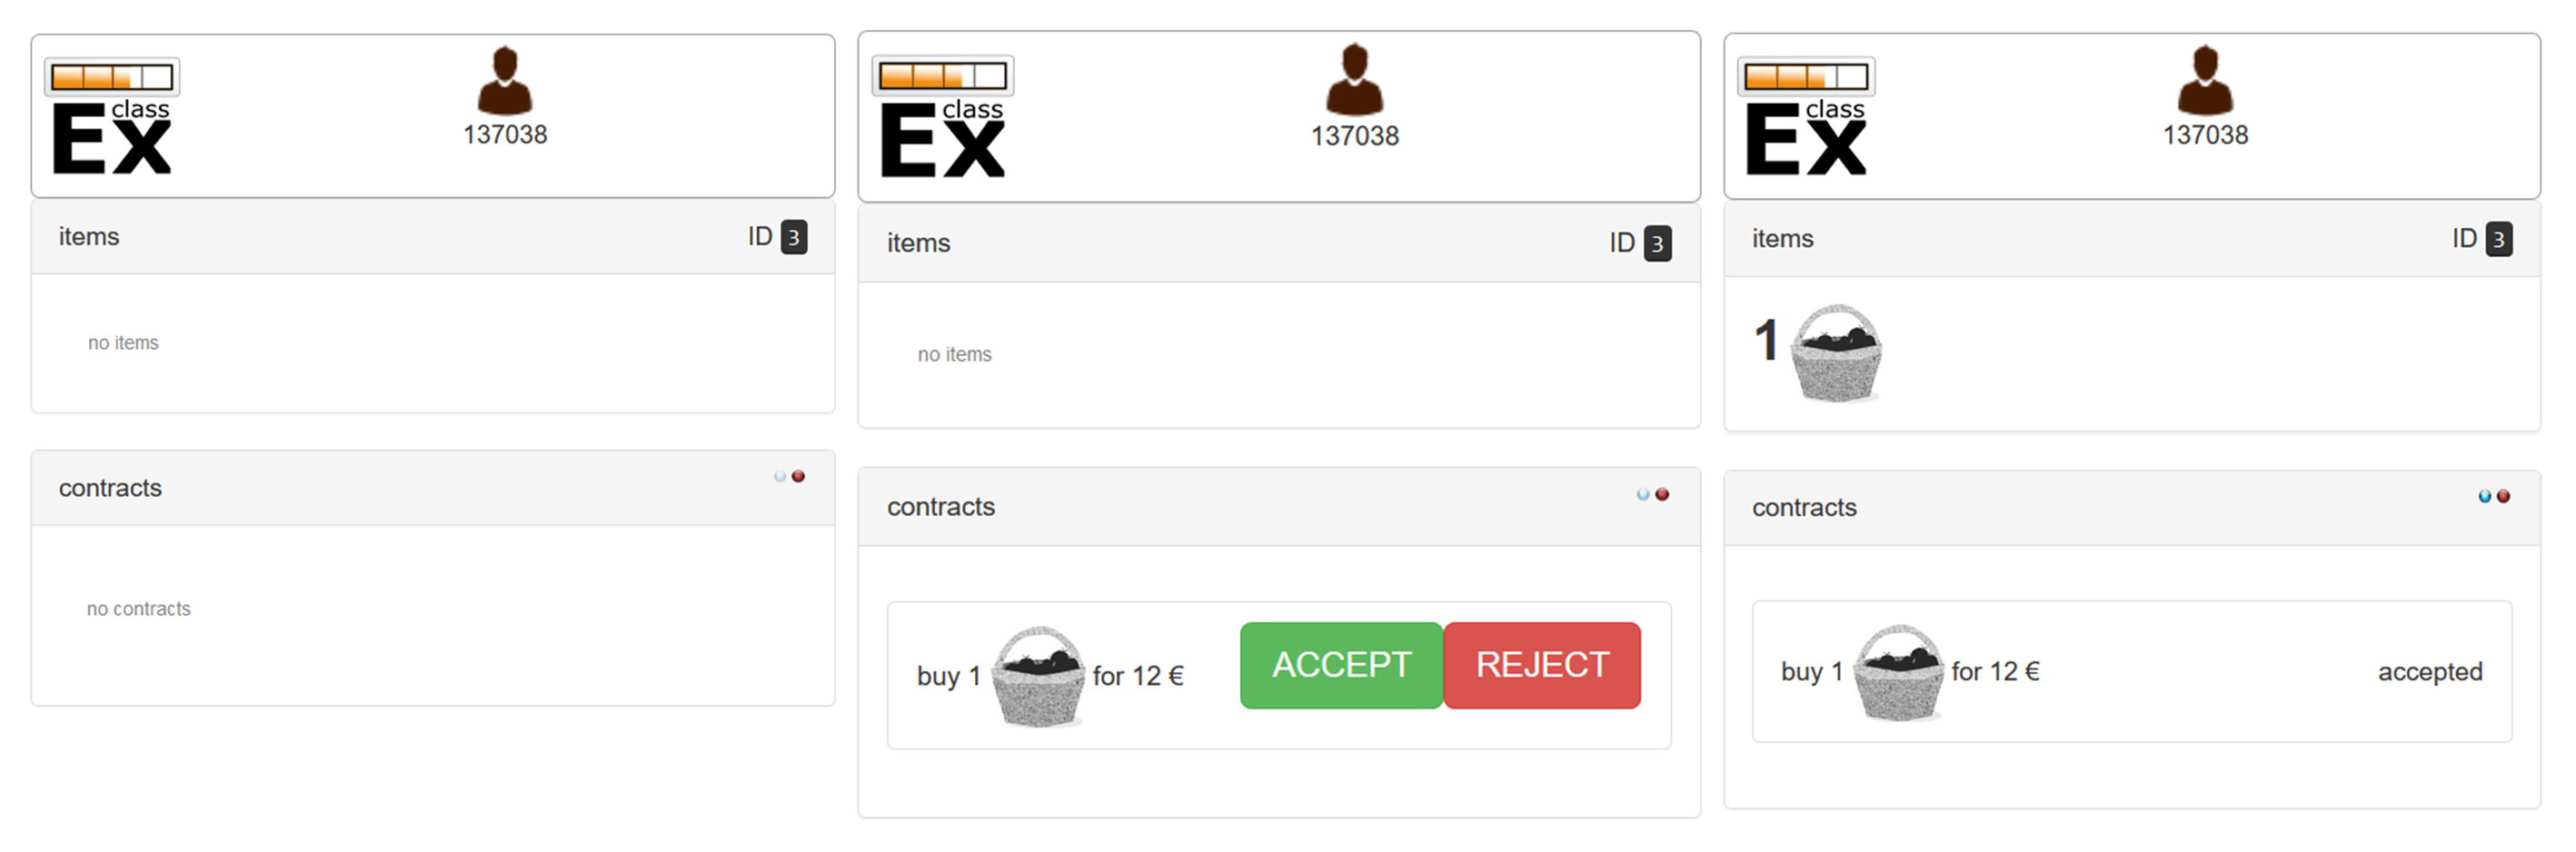
With this element, you can enable participants to conclude contracts. By adjusting the settings, you can customize the contract to your needs. Contracts can be used to trade a commodity between subjects in real time. Subjects move around in the classroom and talk to each other. When they agreed on a price, they enter it into the input mask together with the signature of the counterpart (see seller screen). The counterpart has to accept the trade (or reject it, see buyer screen).
The screen for the seller
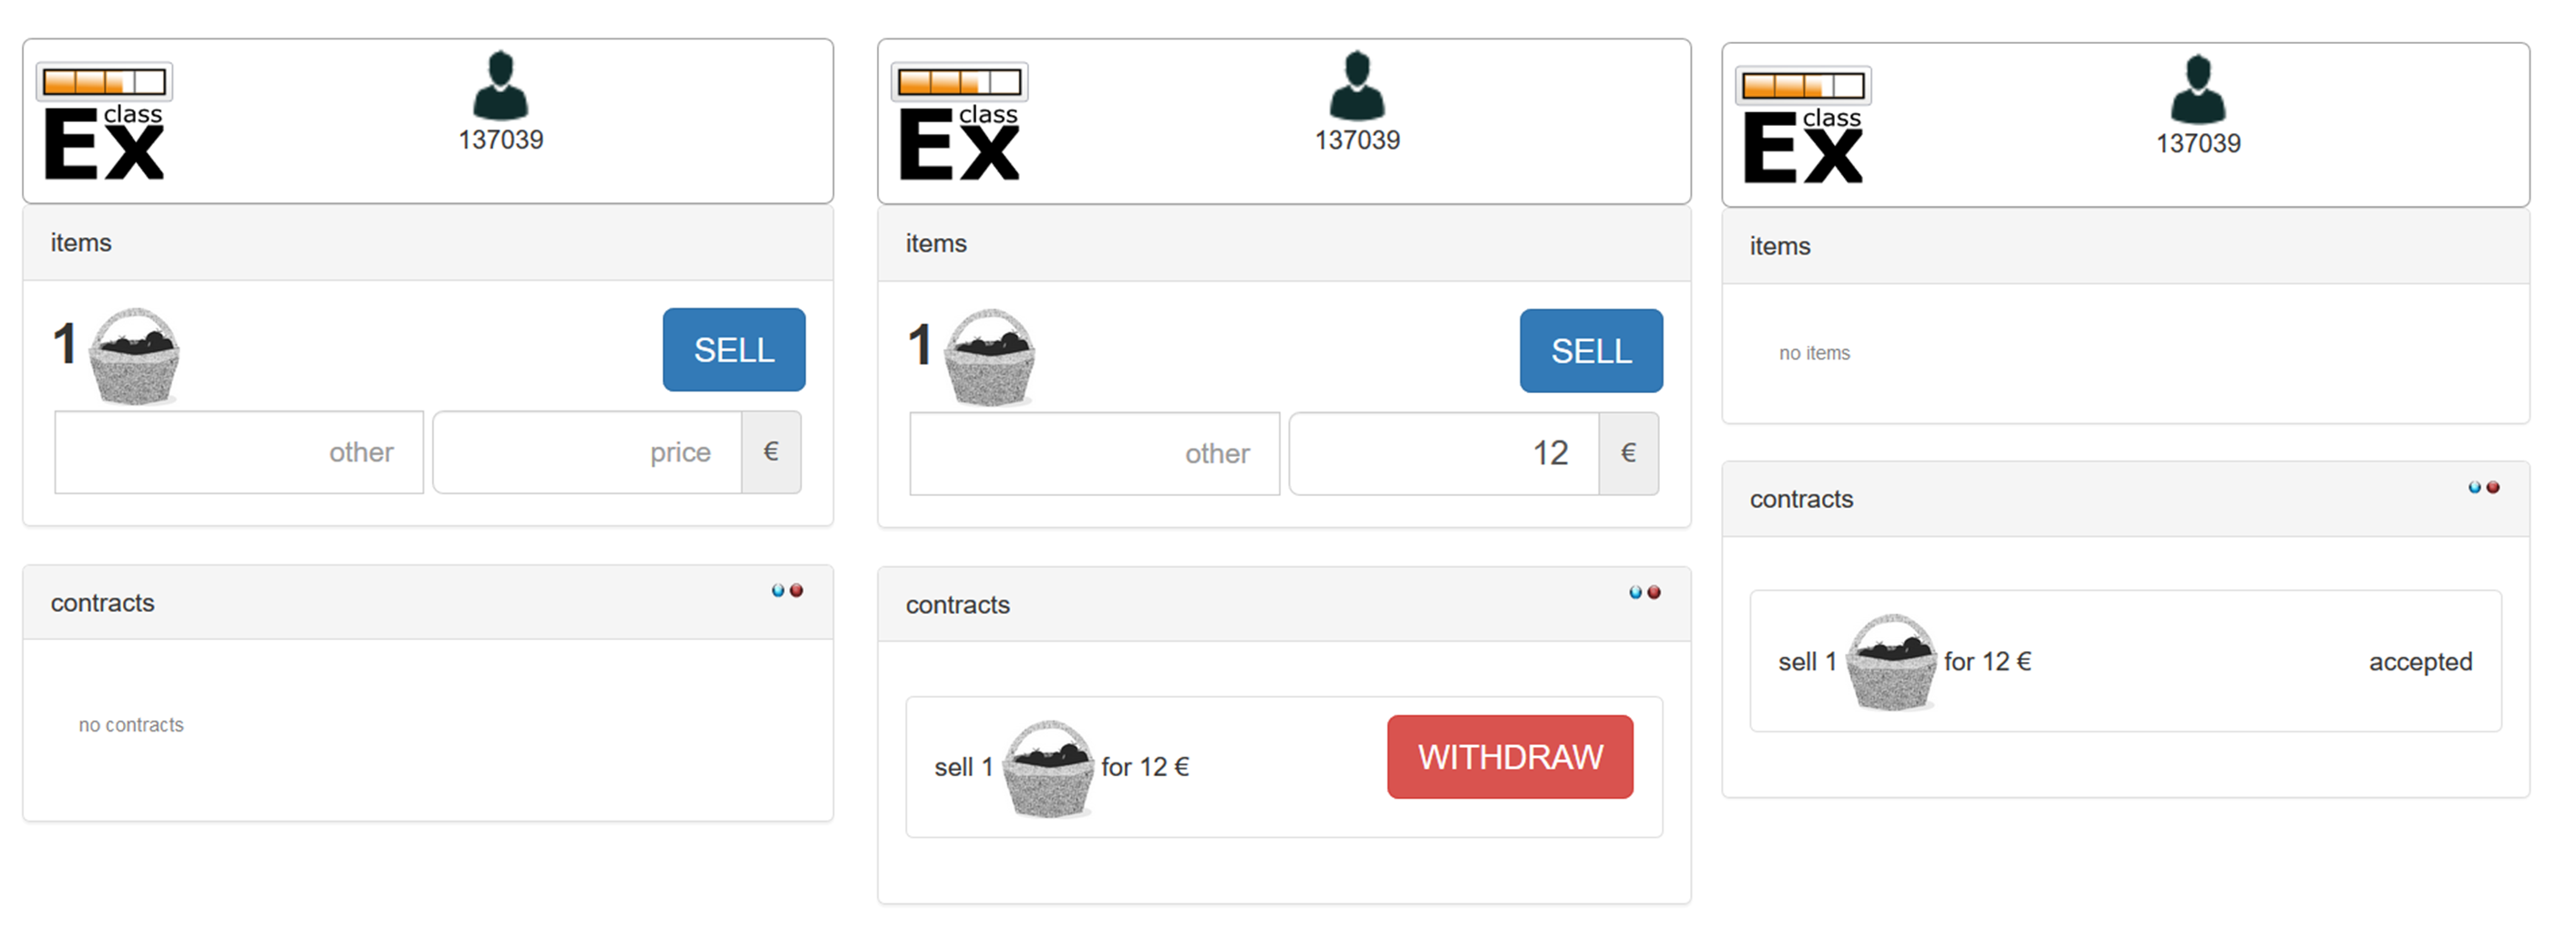
The screen for the buyer
The contracts made can be shown at the lecturer’s screen with the Contract table. In addition, there are special functions in globals and subjects programs to retrieve contracts (see Programming). All contracts are also stored in the standard Excel file, which can be retrieved in the data menu (see Data).
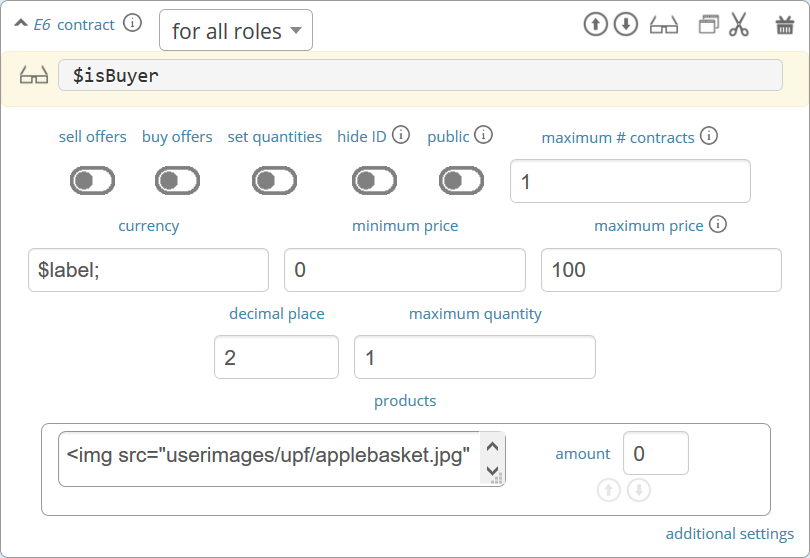
Contracts can be set up by adding contract elements both for buyers and sellers.
- sell offers/buy offers
If you turn this on, you allow for sell or buy offers made by the respective subject.
- set quantities
Allows setting quantities (otherwise quantity is always 1). With quantities, prices are set as price/unit.
- hide ID
allows to disable the ID. The ID is needed for sell and buy offers to be sent to a specific person. E.g. if the buyer can make buy offers, she needs the ID of the seller to send the offer to.
Note
Contract elements use the subject ID as ID for trading (because it is very short). But contracts are stored with the internal participant ID.
- public
If you activate this, offers are made to all other subjects who can accept them. This feature is still in a beta version. So test it with care.
- max # contracts
The maximum number of (accepted) contracts limits how many contracts can be made by a subject.
- currency/min price/max price/decimal place
Currency of the prices and minimum, maximum and decimal places can be specified here.
- maximum quantity
The maximum quantity a subject is allowed to possess. Limits how many items can be bought.
- products
You can specify a name (or a small image) and the initial amount of the good (e.g. the seller has 1 unit, the buyer 0 units).
By clicking on additional settings, further advanced settings can be adjusted.
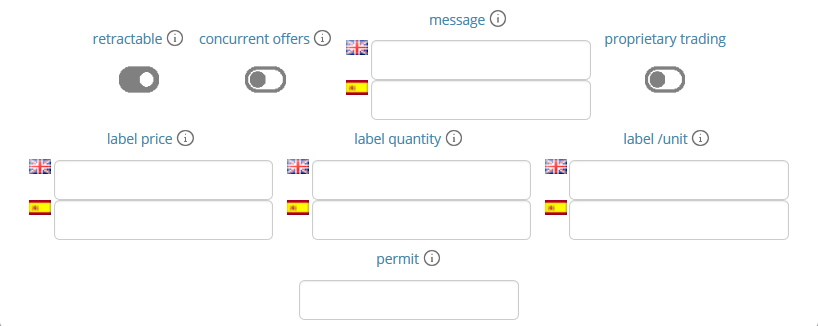
- retractable
This determines if an offer can be withdrawn or not. The default is that offers can be withdrawn.
- concurrent offers
In case of public offers, this determines if more offers can be made at the same time. Note that this is only checked for the respective contract element. If you provide more contract elements to the same persons, the check is only made for each contract element.
- message
You can provide a static message (e.g. about the buyer type) with the contract.
- proprietary trading
This allows you to sell to or buy from yourself.
- label price
The label price can be changed, e.g. to wage. The label is shown in the price field if the field is empty.
- label quantity
The label quantity can be changed, e.g. to hours. The label is shown in the quantity field if the field is empty.
- label /unit
The label /unit can be changed, e.g. to /hour. The label is shown at the price input field.
- permit
If you enter a text or a number here, contracts can only be concluded if you enter a number.
Payoff matrix game
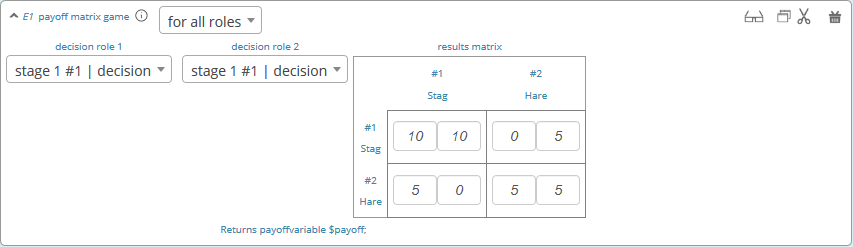

This element helps display the payoff from a two-role game. This is a simplification compared to the use of subject programmes to determine the value of the other participant and calculate the payouts. The same can be achieved with text boxes and subjects programs.
- decision role 1 and role 2
You need to specify which input field contains the decision of the respective participant for the row participant and for the column participant. The labels of the payoff matrix are determined by the specified input fields.
- results matrix
In the table, you enter the payoff for the row participant first, followed by the payoff for the column participant. The payoff is stored as variable $payoff; which can then be used for the winning notification or further calculations.
Camera

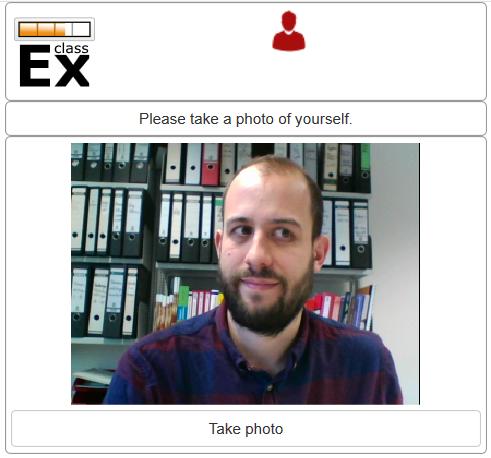
With this element, you can enable participants to take a picture of themselves.
- variable
The variable name, under which the picture is stored, has to be defined.
- allow retake
You can also specify whether the participants are allowed to take a picture again. Only the last picture taken will then be saved.
Note
Informed Consent: Participants are asked by the browser if the browser can access the webcam or not. Please make participants aware that they do not have to take a picture and ask them for their consent.
Retrieving Pictures
Pictures can be retrieved in the following ways:
- At the participant’s screen
You can use the normal variable notation ($image;) to display pictures in text boxes.
- At the lecturer’s screen
You can use
$getValues(...)to retrieve the pictures of all participants and display them (see Functions).- From the stored data
In the downloaded data, you find stored images in the subjects table. They are base64 decoded and can be encoded with free online tools. Just take away “data:image/jpeg;base64,” from the string, so that it starts e.g. with “/9j/….”.
Javascript program
You can also add small JavaScript programs to the participant screen. More information can be found at Javascript.
Filled in form
This element allows you to display the filled-in input element of the previous stage. This element is outdated and should only be used with care.
Similarity check(beta)
In this feature, the main part consists of an input field and a text field to define a variable and get the student’s answer. In the next phase, you can use the predefined variable name and enter the correct solution to compare the correct solution with the student’s answer. You can enter a prompt, questions and a sample solution in the textbox at this stage. Then use the variable name (which you defined in the previous phase) to send the student’s answer and your prompt to the OpenAI server. In response, the AI will send you feedback on the student’s response depending on the prompt you provided. At the end, the feedback is displayed to the participants.
In the Similarity check, the main part consists of one input field and a textbox to define a variable and get the student’s answer. In the next stage, you can use the predefined variable name and enter the correct solution to compare the correct solution with the student’s answer. .. image:: _static/elements/firststep.png :width: 15px .. image:: _static/elements/variablesimilarity.png :width: 15px There are more options to set by clicking on the additional settings: .. image:: _static/elements/additionamset.png :width: 15px
It is possible to define different messages that are displayed on the participant’s screen after the star rating. There are also 4 boxes that can be used to define a separate star range for each game. Depending on the number of sentences in the correct solution, the range of numbers should go higher.
Warning
Please note that the score ranges have a default value each; if you don’t change it depending on the game, it will use the defined value, and there might be a chance of having a wrong result.
In the end, the similarity check calculation method is: Some of the points obtained from the comparison of each pair of sentences (one sentence from the answer with one sentence from the correct solution)
PDF download

The PDF Download element integrates a user-friendly button within the game interface, allowing students to download specific parts of the game material in PDF format. This feature includes a text field where you can add custom text, such as questions and answers, and other relevant content. Additionally, you can add image tags, which will be rendered as images in the final PDF document. Once the content is added, students can easily download it as a PDF document, facilitating access to the material for offline review and study.
OpenAI feedback


The OpenAI feedback element allows you to send a request that includes a student’s answer and a specific prompt to the OpenAI server to receive tailored AI-generated feedback. This feedback is crafted based on the provided prompt and is intended to be displayed to students.
To use the feature, you need to configure the input element, variable name and a textbox for capturing the student’s answer in the first stage. In the next stage of the game, you need to use the same input variable that you set previously and define the output variable name(to store the feedback), and the prompt. For the prompt, you can define a scenario, questions, a sample solution, etc, in the textbox.
- variable
Ensure all variable names are clearly defined and used consistently.
The content field is associated with the system-level message and provides context or high-level instructions for the conversation. It helps set the tone or guide the behavior of the AI model during the conversation. Please only change this field if you want to have another role!
Temperature is a parameter that influences the randomness of the model’s responses. A higher temperature value leads to more varied and creative answers, while a lower value makes the answers more concentrated and deterministic. It is a measure of how much randomness is introduced into the generated text.
Output Storage: store the response of AI(output), without showing it to the participants.
llama3 AI feedback


The llama3 AI feedback element allows you to send a request that includes a student’s answer and a specific prompt to receive tailored AI-generated feedback. This feedback is crafted based on the provided prompt and is intended to be displayed to students.
LLaMA 3 is an open-source AI model developed by Meta AI, designed to significantly improve natural language understanding and generation, showcasing advancements in performance, efficiency, and scalability.
To use the feature, you need to configure the input element, variable name and a textbox for capturing the student’s answer in the first stage. In the next stage of the game, you need to use the same input variable that you set previously and define the output variable name(to store the feedback), and the prompt. For the prompt, you can define a scenario, questions, a sample solution, etc, in the textbox.
- variable
Ensure all variable names are clearly defined and used consistently.
The temperature is a parameter that influences the randomness of the model responses. A higher temperature value results in more varied and creative responses, while a lower value makes the responses more focused and deterministic. It is a measure of how much randomness is introduced into the generated text.
Output Storage: store the response of AI(output), without showing it to the participants.
Mixtral AI feedback

The Mixtral AI feedback element allows you to send a request that includes a student’s answer and a specific prompt to receive tailored AI-generated feedback. This feedback is crafted based on the provided prompt and is intended for display to students.
Mixtral AI, developed by Mistral AI, harnesses a sparse mixture of experts (SMoE) to deliver unmatched efficiency and superior performance. Licensed under Apache 2.0, this open-source model excels in cost-effective computation, outperforming standard benchmarks and offering a robust solution for advanced AI applications.
To use the feature, you need to configure the input element, variable name and a textbox for capturing the student’s answer in the first stage. In the next stage of the game, you need to use the same input variable that you set previously and define the output variable name (to store the feedback) and the prompt. For the prompt, you can define a scenario, questions, a sample solution, etc, in the textbox.
- variable
Ensure all variable names are clearly defined and used consistently.
The temperature is a parameter that influences the randomness of the model responses. A higher temperature value results in more varied and creative responses, while a lower value makes the responses more focused and deterministic.
Output Storage: store the response of AI(output), without showing it to the participants.
Progressbar/round


It is possible to set the Progressbar/Round in the “assignment & matching” tab of each game. This feature allows you to add either a progress bar or a round counter to each game. By default, this feature is disabled (set to ‘none’). When enabled, the following will be shown to the participant:
Percentage Progress Bar: Displays how much of the game has been completed.
Page Number Progress Bar: Shows the number of completed stages.
Round Counter: Shows the number of completed rounds.
Only one option can be active at one time to ensure clarity for participants.
Elements for lecturers
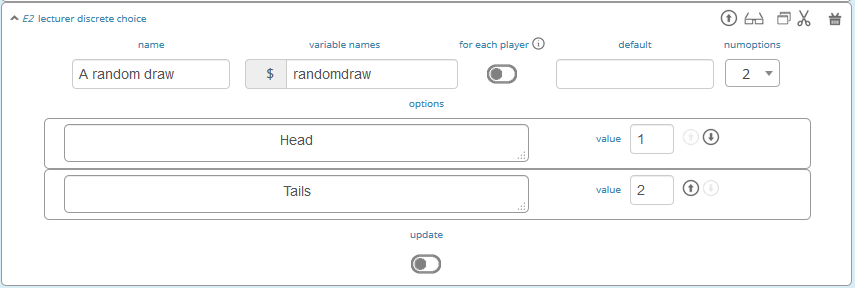
Start button and automatic start
The start button is used to initiate a stage.
Important
Each stage requires a start button or an automatic start. If stages have result elements, this is not true, as result elements automatically provide a button to start the stage (if no other button is defined).
There are two alternatives. A start button which has to be clicked by the experimenter or an automatic start.
Start button

The start buttons allow you to start stages of a game. It is marked in blue and clearly visible to ease guidance for the lecturer. Before the start of the first stage, it additionally states the number of logged-in participants (here: 1).

After pressing the start button, the stage is started, the button disappears, and a counter is shown, which counts the number of participants in that stage. In the example, it means that there are no red participants (0/0) and one green participant who finished the stage (1/1). Counting can be done over all, by role, group or treatment.
The start button can be configured according to the own needs.
- button label
You can name the button (e.g. Start Trade).
- feature
Instead of starting the current stage, you can also use the start button to jump to different stages. In case you jump to the stage where payoffs are distributed, this will suppress the distribution. This can be prevented by following the explanation for the setWinner-function in `Functions`_.
- confirmation message
You can set whether a pop-up should appear after clicking to confirm the action.
- round
You can set whether the current round number should be displayed or not.
- stage name
You can set whether the stage name should be displayed or not.
- count
You can set the counter which appears after the start button is clicked. It can count decisions (also by role, treatment or group if set).
Automatic start

The automatic start button allows you to start stages when subjects have finished the previous stage. With this feature, they can move through the game autonomously.
- mode
The mode can be set to:
start if possible: If a subject finishes the previous stage, it is forwarded to the next stage.
wait for all: Subjects are only forwarded if everyone in the group is done with the previous stage.
no forwarding: Subjects are not forwarded (This feature is only used if subjects forward themselves by clicking on a button. This can be set in additional settings of the input element).
- counter
Setting this additionally allows you to deactivate the counter completely.
- round
You can set whether the current round number should be displayed or not.
- count
You can set the counter which appears after the start button of the previous stage is clicked. It can count decisions (also by role, treatment or group if set).
- stage name
You can set whether the stage name should be displayed or not.
..note:: classEx executes the start element always at the beginning of a new stage. If you, e.g. want to forward all members of a group from stage 2 to stage 3 as soon as all of them have made their decision, you have to implement an automatic start button set to “wait for all” at the beginning of stage 3.
..note:: If you use an automatic start in a stage, you can not use globals programs in this stage, as participants move autonomously through the game and the globals program is only called once.
Winner’s draw

This element should be implemented in the last stage and draw a winner among all participants. The earnings have to be calculated individually on the participant side (see Winner’s notification for participants). You should draw winners only once in a game, as the payoff codes do not distinguish between rounds.
- method
You can determine whether single participants or coupled participants shall be drawn. Drawing coupled participants only makes sense if you have defined roles. For games with two roles, it is advisable to draw coupled participants as winners because the possibility that only one of the two participants could be drawn might overshadow considerations of fairness or reciprocity.
- number
You can also decide how many participants or groups you want to draw.
Important
Payoffs per game are restricted to 100€ per default. If you need higher payoffs, you have to overwrite the variable $maxWin in a global program (e.g. $maxWin=1000;).
Note
Experience has shown that earnings of less than 5€ are usually not cashed in. Therefore, games should be calibrated in a way that ensures that earnings are at least 10€.
Important
Winners are only drawn from participants who made a decision to avoid inactive participants from being drawn. Therefore, it does not make any sense to put the winners’ draw in the first stage.
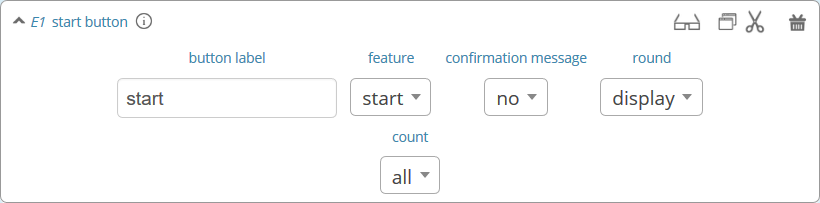
Lecturer discrete choice

With this element, the lecturer/experimenter can make decisions for all participants during the game, e.g. tossing a coin in front of the class and entering the value in classEx so that payoffs can be calculated based on the coin toss.
- name
This name will be displayed on the screen to identify the input button.
- variable name
The value will be saved under this name as a global variable and can be retrieved by that name.
- for each participant
If you switch this on, you can set the value for each participant separately. The value will be stored as a global variable in an array with the participant ID as the index.
- default
You can set a default.
- options
You can specify options with different values.
- update
If you switch on the update, the element will check every two seconds if new participants have arrived (only necessary when you switched on “for each participant”).
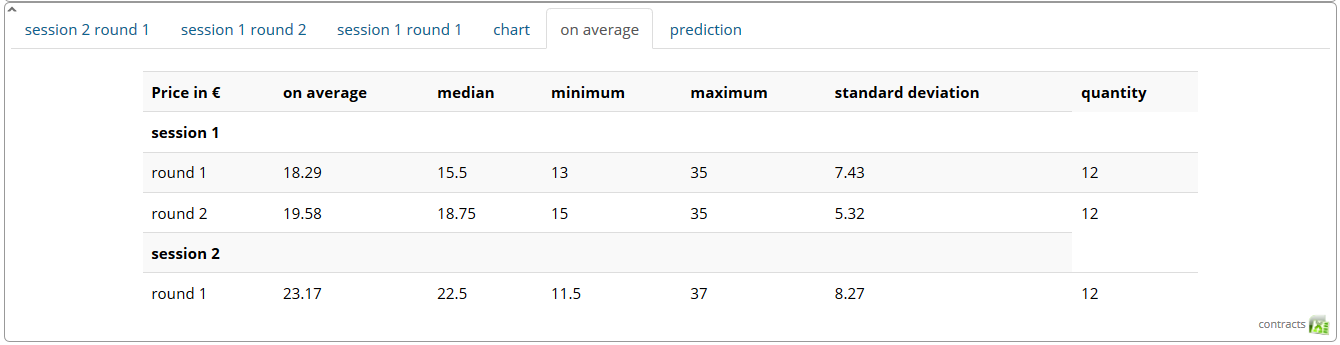
Contract table
With this element, all contracts that were concluded by participants, as well as a chart and the average, are displayed on the lecturer’s screen. In the contract table, you have several tabs that you can switch between. You can see them in the figures below.
The first tab lists the contracts for each round separately. If set, you can also display seller costs and buyer values along with the contract.
Note
The combination of session and round is a special feature in some games (apple market, fish market, …). Normally, classEx only knows rounds.
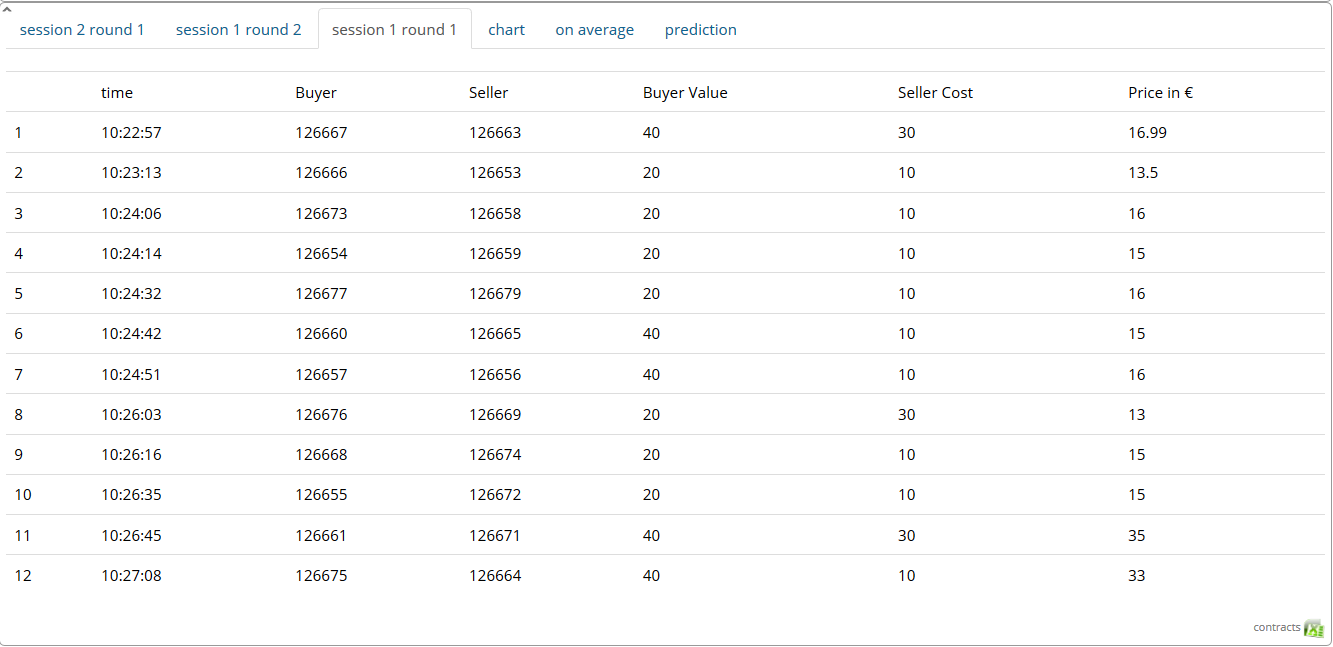
The tab on average provides summary statistics for each round (mean, median, min, max, std dev).
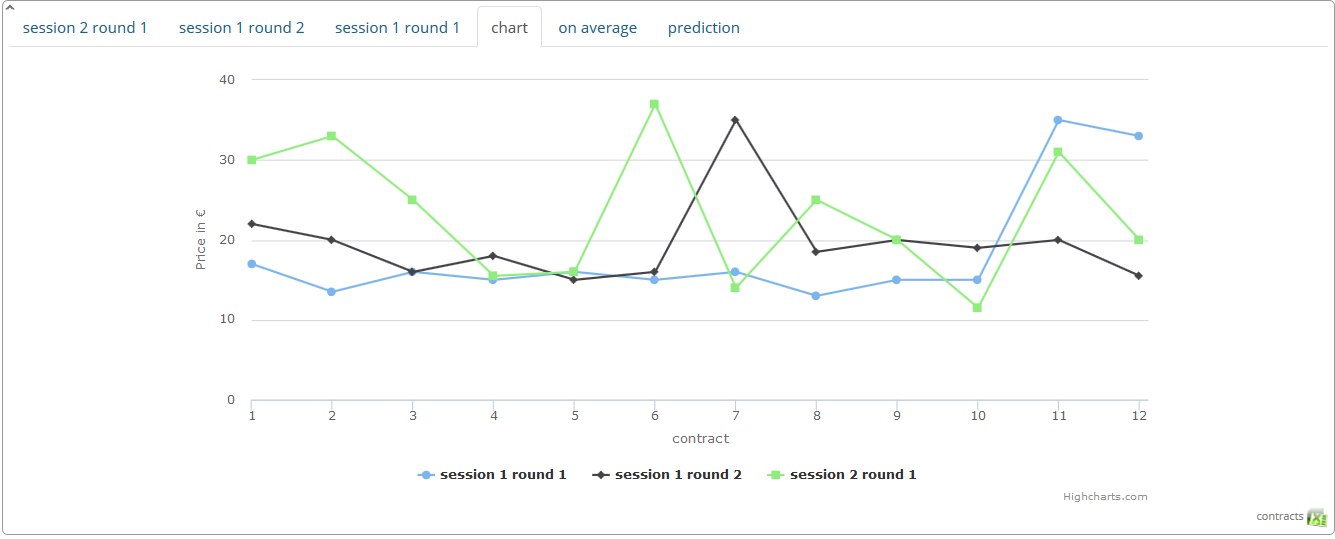
The tab chart shows contracts made over time. In case of different quantities, it also shows a bubble chart for the combination of quantities and prices.
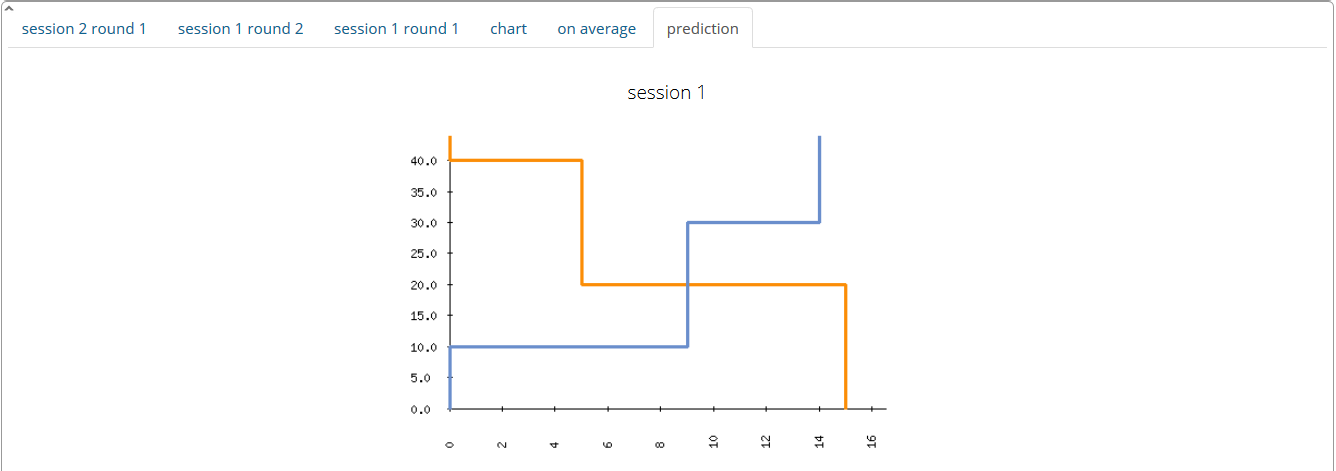
The tab prediction shows a prediction (if set). To create a prediction, the variables $demand and $supply have to be filled in a global program. $supply and $demand should be arrays which contain prices as indices and the resulting quantity as a value.
The following settings can be adapted:
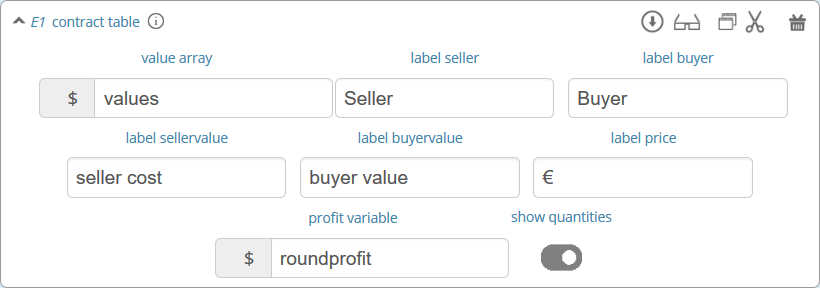
- value array
Gives the name of a (pre-filled) array which contains the role of the participant as index and the respective buyer or seller value as value. This is shown in the table as buyer/seller value.
- label seller/buyer/price
All labels in the table can be changed according to needs.
- label seller value/buyer value
If these are left empty, the columns seller value or buyer value are not displayed. If a text is provided, columns are labelled with the text, and classEx reads the value array to provide seller/buyer values.
- profit variables
Can be left empty.
- show quantities
Additionally shows quantities in the contract table and a bubble chart with quantities and prices.
Result element
For displaying the results of a game, various types of charts are available.
Important
Note that you can only display saved subject variables. Decisions for input fields are saved automatically so that they can be displayed as well.
Whenever you can select variables in a field, you only need to insert the variable name (e.g. “payoff”). If you want to use variables in other settings (e.g. the maximum), you have to use the standard notation (e.g. “$payoff;”), which gives the value of the variable.
For most result elements, you can change the setting for count. By this, you can determine whether results shall be displayed separately for groups, treatments or roles (if defined).
Results single/multiple choice questions
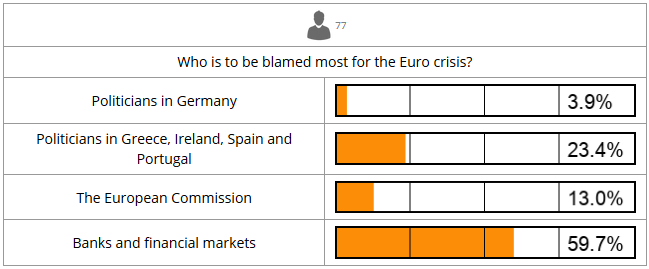
The results are displayed with percentage bars. The element automatically detects if the input is multiple choice or single choice. Hovering over the bars gives the absolute frequency of participants who opted for that option. The element should only be used with input fields with predefined options (otherwise you should use the Results counter).
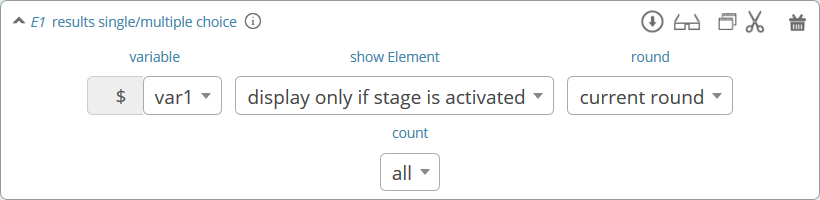
The following settings can be changed:
- variable
Provide the name of the subjects variable.
- show element
Always display the element, or only if the stage is activated.
- round
Select if only the current round or all rounds should be displayed.
- count
Participants are counted altogether (or per treatment/role/group).
Results histogram
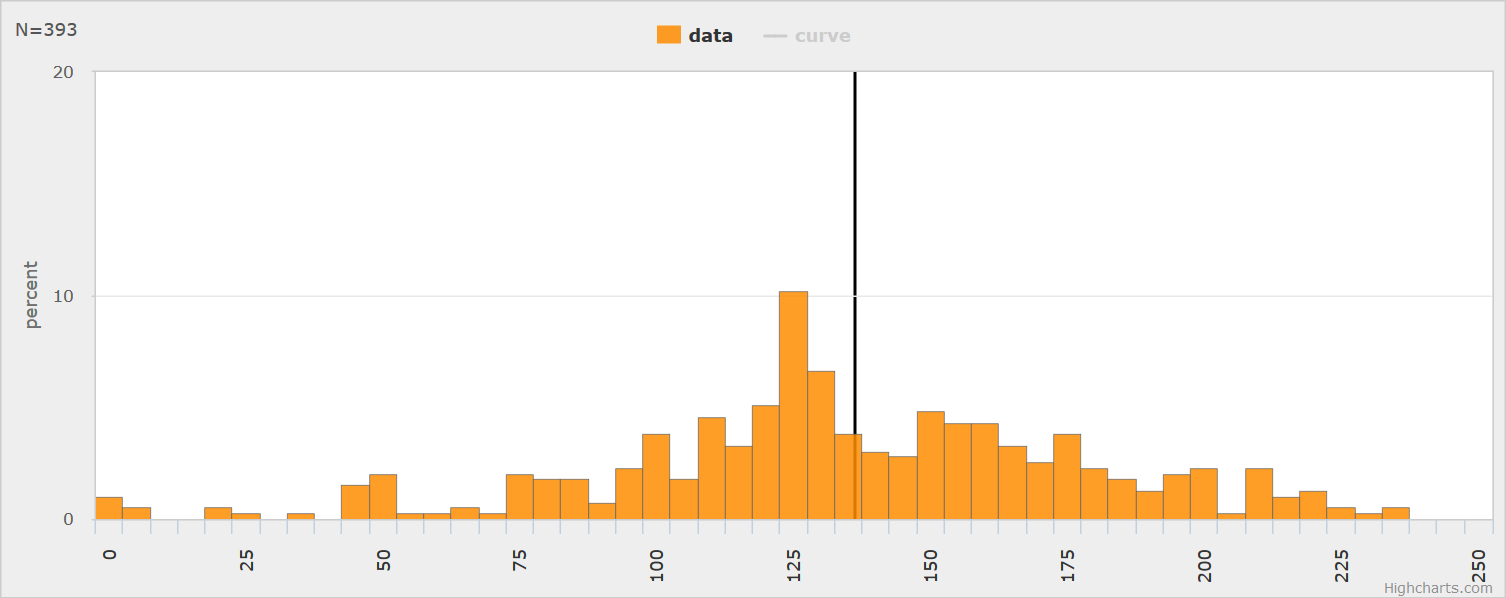
The histogram draws the distribution of a variable. The black line marks the mean. Decisions are clustered into so-called bins (here bins of 5). The graph allows for zooming and for adjusting the bin size and the maximum.

The following settings can be changed:
- variable
Choose which variable you want to display.
- show element
Element is always displayed, only if the stage is activated or if it is activated and after.
- min
The minimum of the histogram (Default 0).
- max
The maximum of the histogram.
- size of bins
How the values shall be pooled into bins. For example, if you define the bin 10, the data will be pooled in groups of ten.
- label x-axis
The label you choose for the x-axis is displayed below the x-axis.
- vertical line
An additional red vertical line is drawn at the selected x-value (e.g. to specify a correct or true value).
- round
Select if only the current round or all rounds should be displayed.
- count
Participants are counted altogether or per treatment/role / group.
Note
All values that are larger than the displayed maximum value are automatically pooled into the last bin.
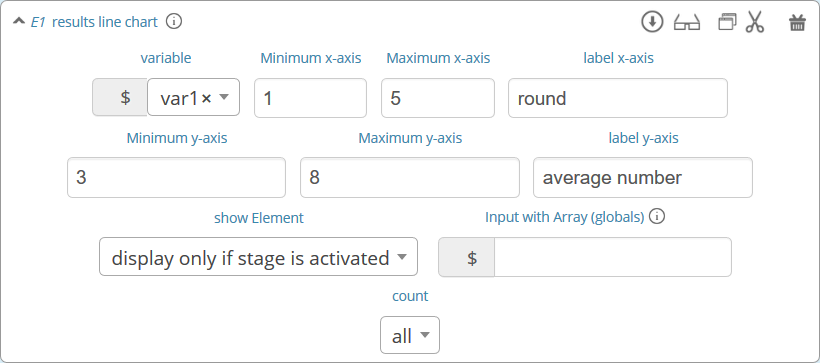
Results Line Chart
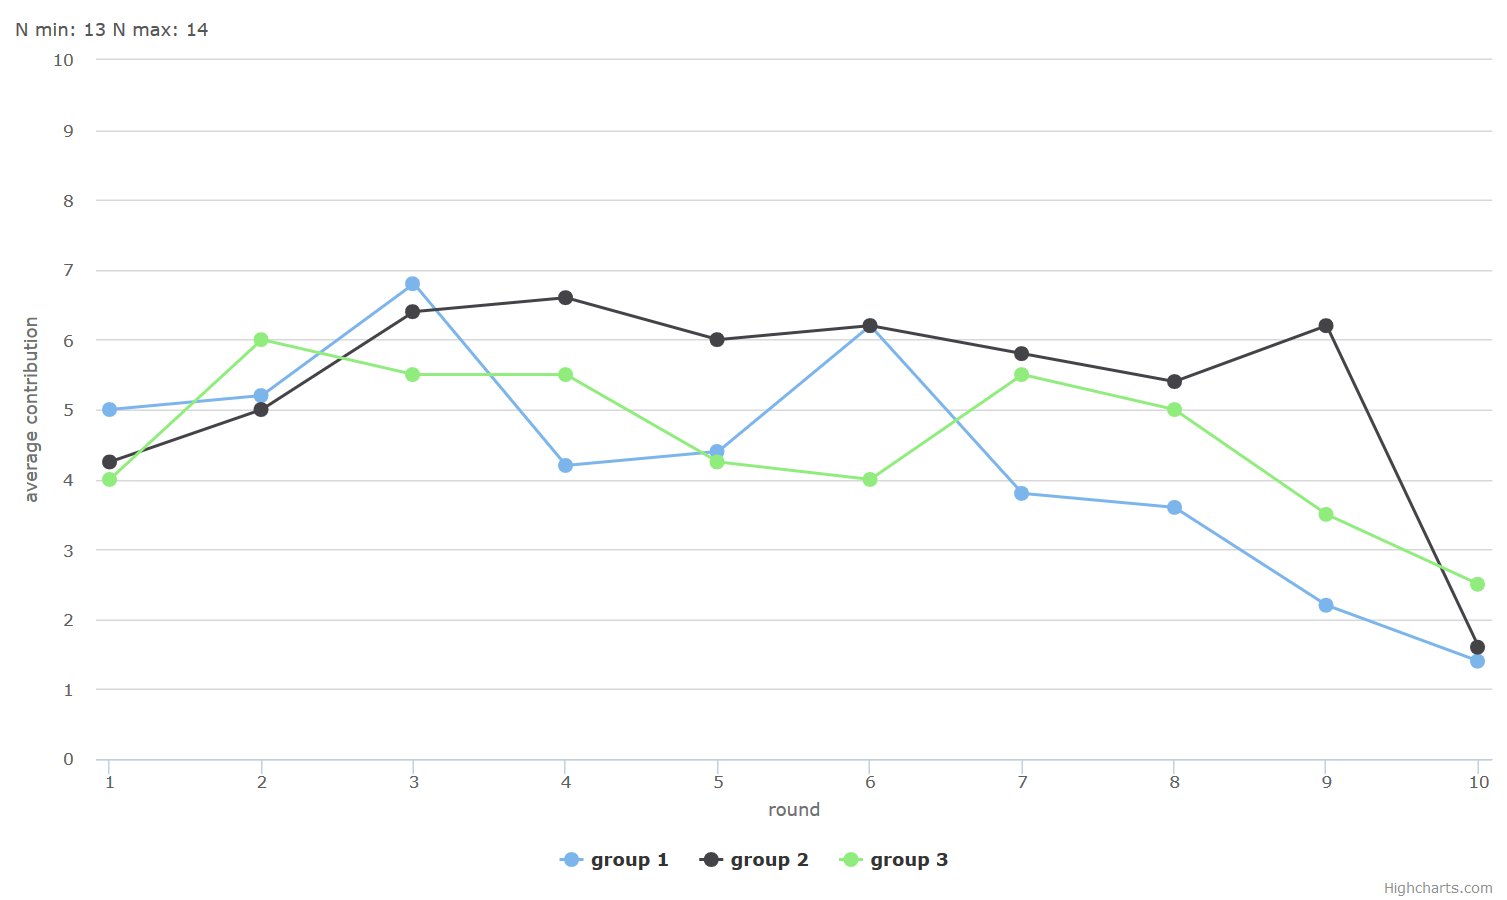
A line chart enables the display of the results of several rounds. The line chart automatically calculates the average of the input variable over all subjects. If the input variable is a discrete choice variable, the result is displayed as a percentage of choices. In the example, you can see a public goods game with three groups. The graph allows for zooming.
The following settings are available:
- variable
The variable which should be displayed.
- minimum/maximum/label x-axis
Minimum, maximum and label of the x-axis
- minimum/maximum/label y-axis
Minimum, maximum and label of the y-axis
- show element
Always display the element, or only if the stage is activated.
- input with array (globals)
If you provide the name of a globals variable here, the variable setting is overwritten and the data is taken directly from the globals array. The array should have the x-value as the index and the respective y-value.
- count
Participants are counted altogether (or per treatment/role/group).
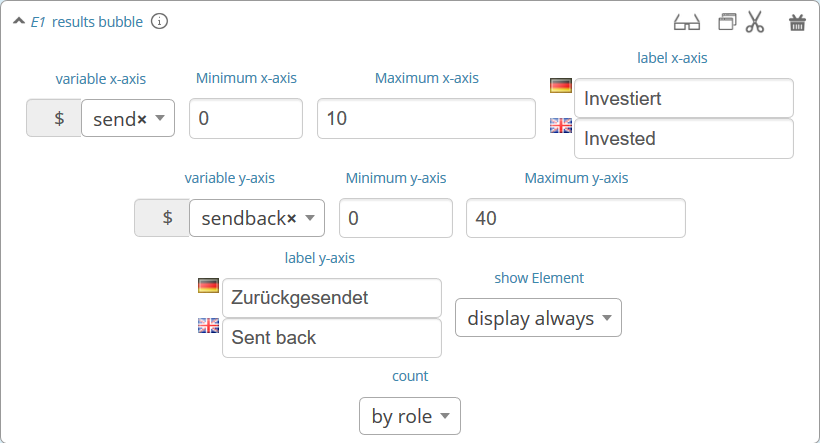
Results bubble
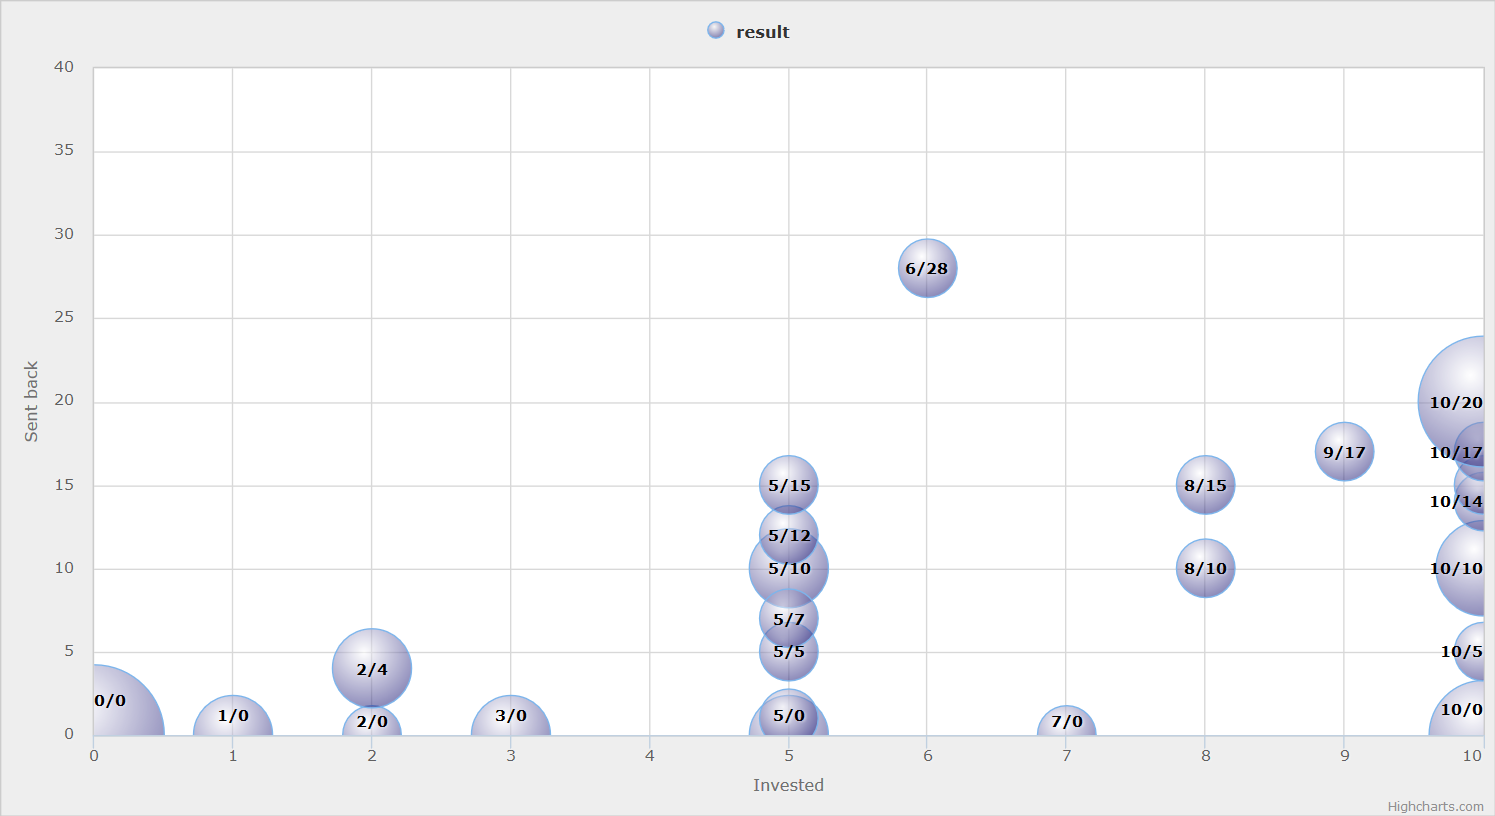
The bubble chart displays the linkage between two continuous decisions, e.g. amount sent and amount returned. The size of the bubble shows how often the number was chosen. The number in the bubble shows x-value / y-value. If you display by role, group or treatment, bubbles in different colors are displayed. Hovering over the bubble shows the total number of observations. The graph allows for zooming.
- variable x-axis and y-axis
The variable which should be displayed on the x-axis and y-axis.
- minimum/maximum/label x-axis
Minimum, maximum and label of the x-axis
- minimum/maximum/label y-axis
Minimum, maximum and label of the y-axis
- show element
Always display the element, only if the stage is activated or only if it’s activated and after.
- count
Participants are counted altogether (or per treatment/role/group).
Results counter
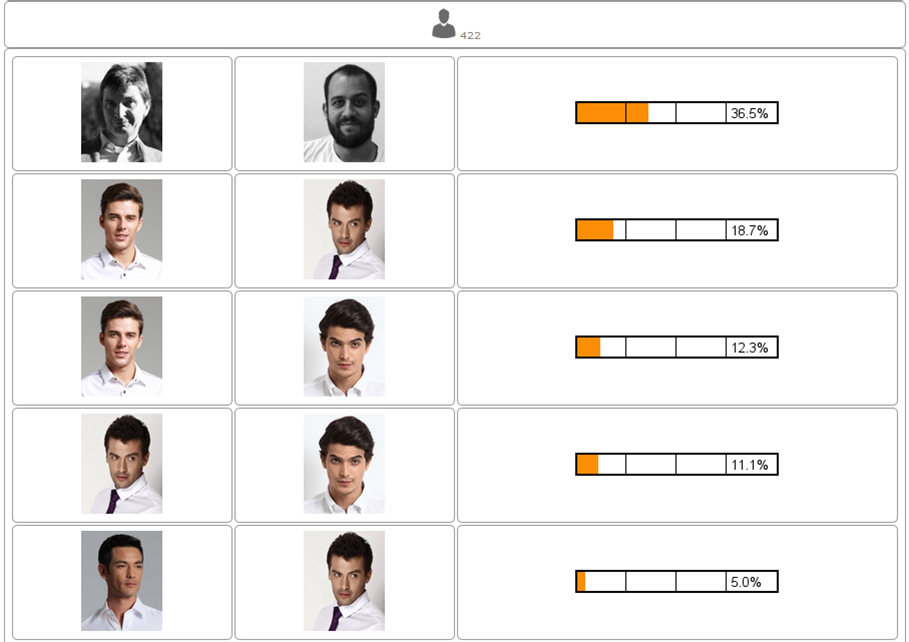
The counter enables you to display the relative frequency with which a specific answer was chosen. Hovering over the bars gives the absolute frequency of participants who opted for that option. The counter can be useful if the set of answers is open (e.g. text input). It lists all variable inputs according to their frequency.
Note
Using a multiple choice input field will result in the listing of combined answers. E.g. You can select A, B, C (multiple choice). Then the counter element will display how many per cent chose A, A&B, A&C,… If you want to have the items analyzed separately (only A, B, C), you should use Results single/multiple choice questions.

- variable
The variable which should be displayed.
- maximal number
This limits the maximum number of answers to be displayed. E.g. if this is set to 10, only the 10 most frequent answers are shown.
- show element
Always display the element, only if the stage is activated or only if it’s activated and after.
Results game matrix
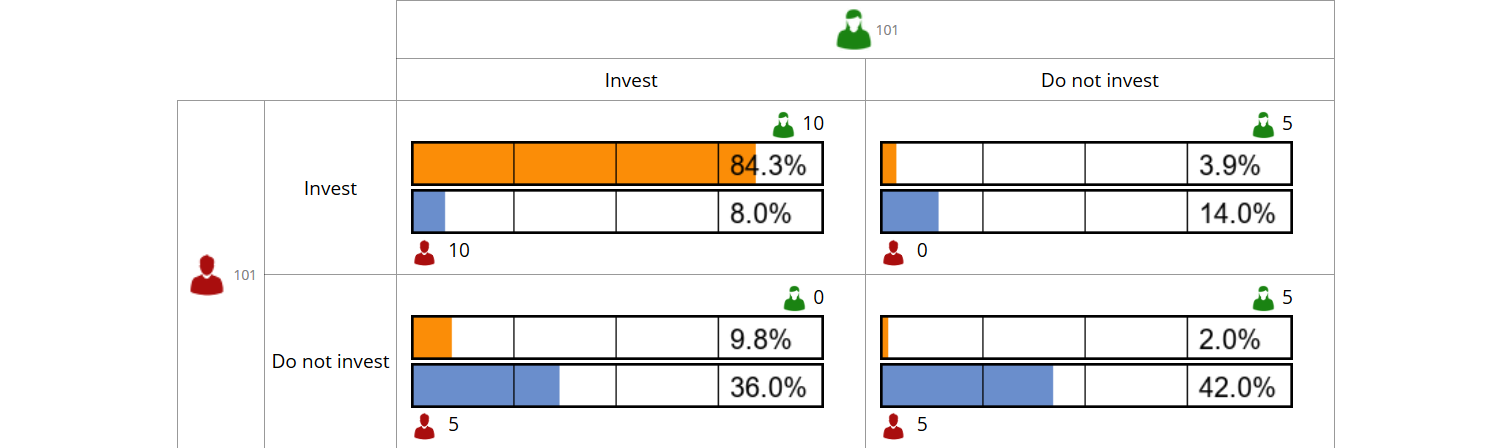
The matrix displays the linkage between two discrete decisions. If a game, e.g. is played with two different participants, the results can be displayed as a matrix. Or if a participant makes two different decisions, the linkage between the two can be shown.

- decision role 1
The decision for the row participant.
- decision role 2
The decision for the column participant.
- results matrix
Here you can specify the payoffs for each combination. The first value is the row participants, the second value is the column participants.
- show roles
This setting determines if the role figure is displayed next to the payoffs in the matrix table.
- show element
Always display the element, or only if the stage is activated.
- display results
Here you can choose if results should be pooled over all rounds or displayed separately for each round.
- count
Participants are counted altogether (or per treatment/role/group).
Note
The displayed matrix only determines the image on the lecturer’s screen and not the payoff for participants. The payoff is calculated individually for the participants (either through the element Payoff matrix game or through a subjects program).
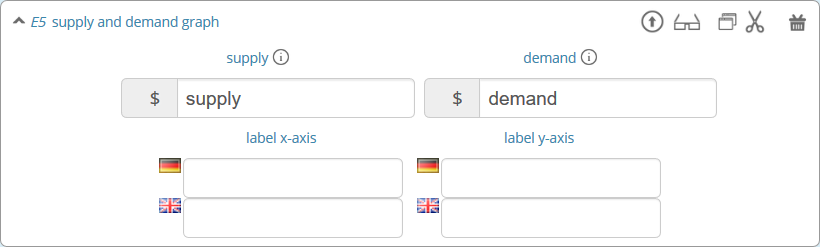
Results supply and demand
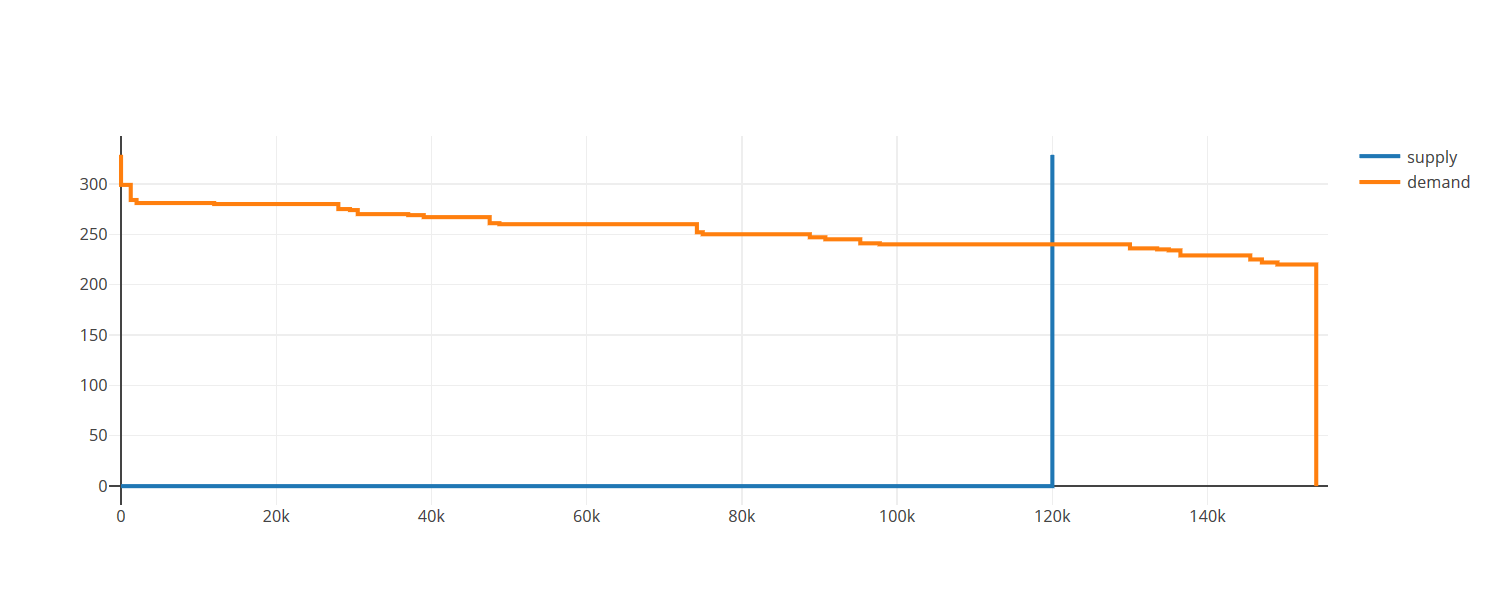
This element displays a supply and demand graph. It uses arrays, which are calculated in a globals program to display supply and demand. The graph allows for zooming.
- supply
This is the name of the globals variable which contains the supply data. The index of the array is the price, and the value of the array is the number of suppliers which are willing to supply at this price. E.g. if you have 2 sellers with seller cost 20 and 4 sellers with seller cost 40, the supply array should be
$supply = array(20=>2, 40=>4);. Note that the number of sellers is not cumulative across prices. This is automatically done by classEx. If you provide a two-dimensional array, you can plot more than one supply line, e.g.$supply = array(1=>array(20=>2, 40=>4), 2=>array(10=>3, 20=>1));draws two supply lines.- demand
This is the name of the globals variable which contains the demand data. The index of the array is the price, and the value of the array is the number of demanders who are willing to buy at this price. The logic follows the description for supply.
- label x-axis/y-axis
Labels can be provided for both axes.
- count
Participants are counted altogether (or per treatment/role/group).
Results pie chart
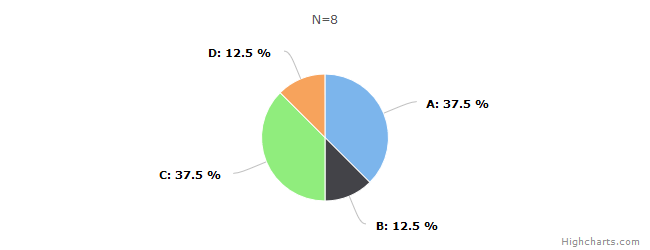
The pie chart shows the distribution of discrete choices as a pie chart. Slices of the pie can be highlighted by clicking on them. The graph allows for zooming.
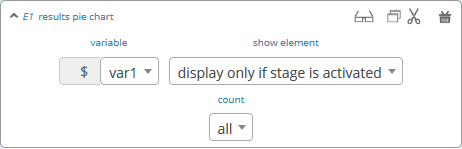
- variable
The name of the variable
- show element
Always display the element, or only if the stage is activated.
- count
Participants are counted altogether (or per treatment/role/group).
Note
If you provide a numeric input as a variable, classEx plots all numeric inputs from the stage in the pie chart. This only makes sense if you ask for percentages (which add up to 100%). For example, see the game Ricardian equivalence in the macroeconomics folder.
Results Likert scale
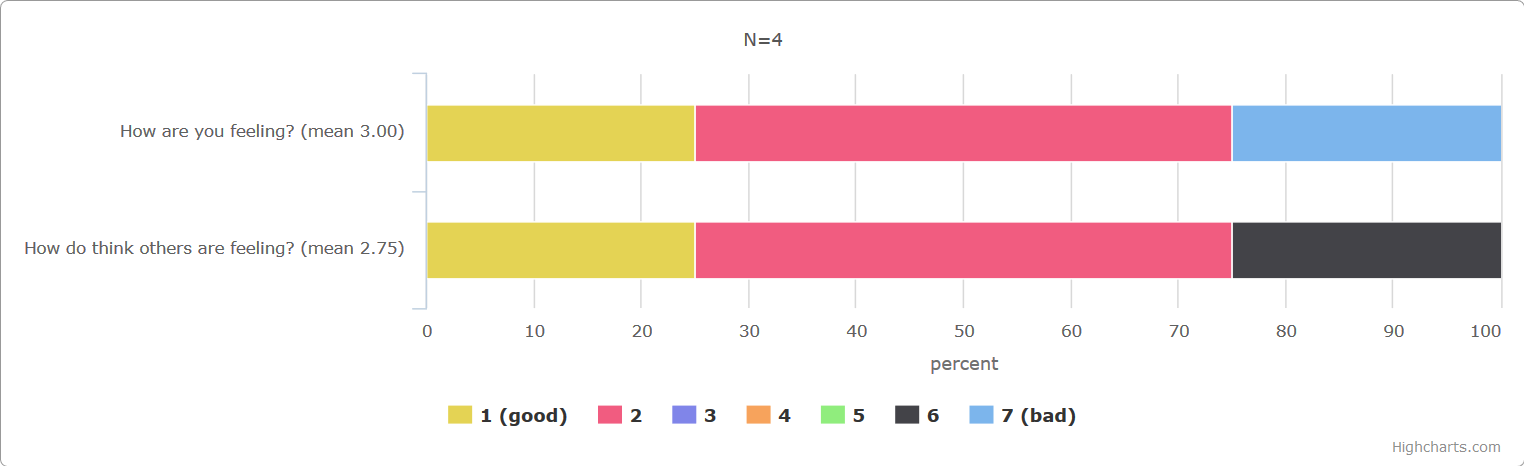
This graph allows you to show data from Likert scales if the input was provided with a Radioline or Slider. It shows the distribution and provides the mean. The graph allows for zooming. The graph allows for showing multiple variables in one graph.

- first variable / last variable
Here you can select the variable(s) to be displayed. If you select, e.g. variable #1 to #3 from a stage, the graph shows all three variables #1, #2, and #3. If you want to show only one variable, just select the same variable for the first and last variable.
- count
Participants are counted altogether (or per treatment/role/group).