Develop your own games
In the following three chapters of this documentation, you will learn how to design and implement your own games. The chapter “Develop your own games” will begin with the basic functions of the editing mode and explain some patterns that every game in classEx follows, such as the way participants are assigned and matched when the game starts. The chapter “Elements” describes all the different elements you can use to build your own game. To avoid the need for experimenters to learn a lot of programming, classEx games are designed to be modular. Thus, every element is like a brick you need to construct your game. The last chapter, “Programming”, shows how to create more powerful, dynamic games by combining already existing elements with some PHP programming.
To develop your own games in classEx, change to the editing  . In the editing mode, you can create games according to your own needs. Games can be clicked together with an easy-to-use, modular backend system. You divide your game into stages, and you can add different elements (input, output, calculation,…) to your games.
Note
In the editing mode, changes are stored automatically. If you change an element of your game and click next to the element, the element is stored. Most of the elements blink green when they are stored.
Note
If a game has already been played by at least 10 participants, it cannot be adapted any more. The same applies if the game was created by another person. You can, however, copy the game and then adapt it.
Settings in the top bar
The top bar in the editing mode looks like this:

It provides you with several options, which are described below.
Select game
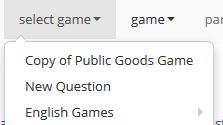
Click on the button in the left corner to open the drop-down list of your existing games. Clicking on a game will open the selected game in editing mode. If you open the editing mode, the currently running game is preselected.
Game
By clicking on game, a dropdown menu will open, which shows up to four possible options. The number of options is reduced if you do not own the game. Then, e.g. you cannot delete the game.

Game settings
Clicking on game settings, a new screen appears. On this screen, you can change different settings of the game. You can also access this screen from the overview by clicking on the  symbol next to the name of a game. Changes to any field are again saved automatically.
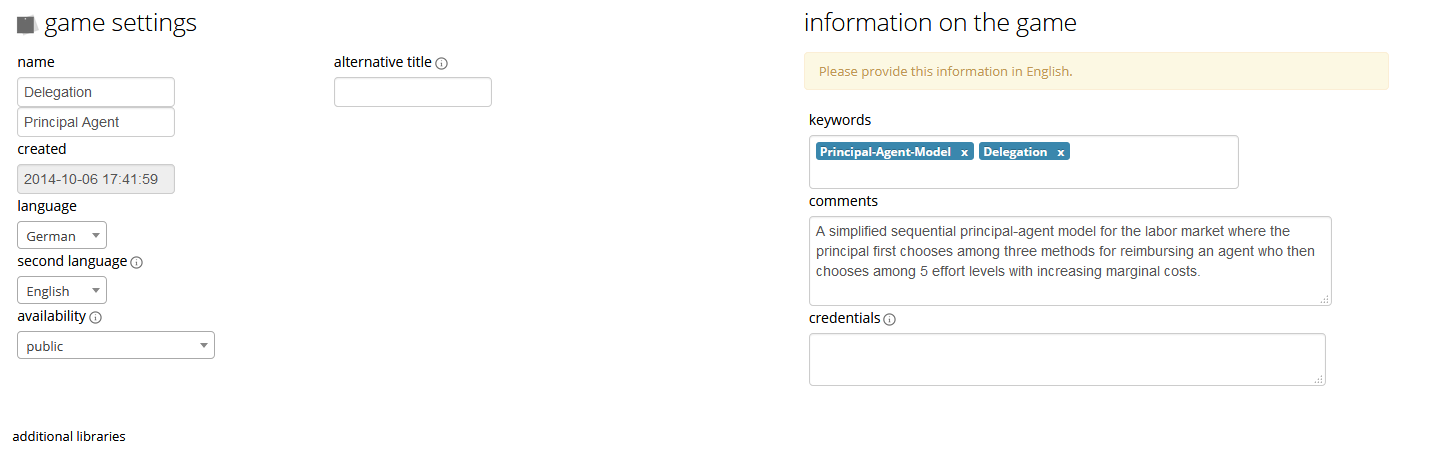
- Name of the game
First of all, you can specify the name of the game. If your game is available in different languages, you have to provide a translation of the title as well.
- Alternative title
You can also define an alternative title, which is displayed instead of the name wherever the game is listed in your own account. Other users will see the original name of the game and not the alternative title. .. note:: This feature is useful if you imported a game which has the same name as one of your games. Then you can use the alternative title to distinguish from your game, because you cannot change the original name of the game, which belongs to another user.
- Creation date
The created field shows the creation date of the game, which is not editable.
- Language
For each game, you can specify a primary language and optionally a second language. If you add a second language, all text fields will be shown twice for both languages.
Note
If a text field misses the multi-language feature, you can input the text in both languages separated with $$. One example would be: Please decide now$$Bitte entscheide jetzt.
Note
classEx always chooses automatically which language to use based on the account language. If the game is available in the account language, it uses this language. Then it tries to find an English version. Otherwise, it displays the available language.
- Availability
You can specify whether you would like a game and its results to be public or not. By default, all games (and their results) are public. You can set a game (and its results) to private, or you can set only the results to private and the game to public. In the latter case, other experimenters can still copy your game, but they do not see the previous results by you. If you decide to set games or results to public, they become subject to a creative commons license as described in the terms of use. You can change the setting of public and private also in the overview by clicking on
 for private or
  for public next to the name of the game. The option to set only the game public, but results private, is not available there.
If you set your game public, it can be found in the Repository and others can play and copy the game. If you set your game private, it is not listed in the repository anymore, but previously made copies of your game will remain with their owners and are not revoked.
- Additional libraries
If you click on additonal libraries, new settings appear. You can select to load different libraries for the participants. Libraries are packages for special usages. They come with an increased necessity to load data from the server (for each participant). Therefore, you should only turn them on if you need them. For lecturers, they are loaded automatically. The three available libraries are plotly or highcharts for drawing graphs on the participant screen. The library phaser can be used for creating game-like interactions. For more information, visit the respective website of the library by clicking on the library’s name.
Information on the game
Here you can classify your game and provide meta-information on the content. This information can be accessed by other users and provides them with more details on your game. Please provide this information in English.
Note
classEx promotes the idea of sharing games. Therefore, it is important to provide meta-information on games so that they can be found easily. Another advantage is that you can transfer your meta-information directly to the data repository:ref:Run:Data.
- Keywords
You can provide a set of keywords to better describe your game. Many standard keywords for typical games are offered automatically when typing in some characters. Keywords are shown in the repository.
- Comments
In the comments section, you can provide a brief description of your game. Comments are shown in the repository, and if others import your games to their account, it is shown in their overview.
- Credentials
This field can be used to state a reference or source of your game. This will be shown in the repository and displayed in the lecture mode below the title of the game.
Copy game
If you click on copy game, the currently selected game is copied and can then be edited and adapted.
Note
The difference between copying and importing is that with the latter classEx only sets a reference to the original game. Therefore, it cannot be modified, but only used. A copied game, instead, is a complete copy of the original game and can be changed.
Delete game
By clicking on delete game, the currently selected game is deleted. For your safety, you will be asked if you really want to delete the game. It is not possible to delete the game if it has already been started in the lecture mode. You then need to start a different game in the lecture mode before being able to delete the selected one. You cannot undo the deletion of a game.
Note
If you accidentally delete a game, please email classEx@uni-passau.de as soon as possible. Internally, we completely remove deleted games only each month, so that recovery is possible.
New game
Clicking on new game creates a new game. A standard new game is always a single-choice question with four possible answers. Before you can edit the game, classEx takes you to the Game settings of the created game, where you have to provide a title. You have to select a language and choose whether the game should be public or private. Once you are done, click on save to create the game. classEx automatically takes you to editing mode, where you can proceed with designing the game.
Parameter
If you click on parameters, you can edit the parameters of a game. Parameters are global variables that can be changed right before starting a game. They allow other lecturers to run your game without changing the implementation of the game. More information can be found under Parameters.
Test a game
Before actually using a game in your lecture or while you develop, you can always test a game. To do so, switch to the lecture mode and select your game if it is not selected yet.
Next, open as many test participants as you need for testing your game by clicking on the add test participant icon  . This opens a participant screen in a new tab. You will see the game just as your subjects will see it when actually playing the game. You can open as many test participants as you want, which enables you to also test interactions between participants.
Note
If you use Chrome as a browser, you can open multiple test participants by holding the Ctrl-Key and clicking multiple times on the test participant icon .
Then start your game. You can perform the interaction required in the browser tabs for each participant, and you can see how your game is running.
Note
Test participants are not reload-safe. This means that if you reload the page, in some cases, the content of the page may change. Real participants cannot do this.
If something is not working, go back to the editing mode and check your settings there. If you used variables and programs, you can use the Diagnosis tool for error spotting. The diagnosis mode shows all available variables and helps to debug them.
Note
All major browsers also provide their own development tools, which can be very helpful for error spotting. They provide a console which gives feedback on potential errors. In this console, you can also observe the background task performed by classEx and whether they are running correctly. Finally, it allows you to see JavaScript errors. In Firefox, the development tools are started by hitting F12.
Define Stages
Stages are points of synchronization in a game. Synchronization means that for the next stage to begin, all elements of the previous stage must have been finalized. Generally, the input phase is one stage, and the results phase is a different stage, as the output can only be displayed after all participants have entered their input. Stages are ordered in tabs in a horizontal way in classEx. The first tab is not a stage - it shows the options for Assignment and Matching of roles, treatments and groups.
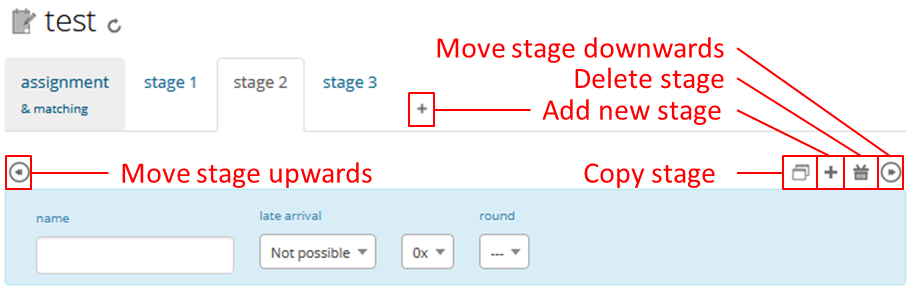
Name of a stage
You can choose to give the stages names instead of numbers in order to identify them more easily. To give them a name, simply enter it in the box. The name is then displayed below the stage number in the tab.
Note
classEx stores stages internally with a unique ID (which has between 4-6 digits) and neither with the name of the stage nor the number of the stage within the game (stage 1, stage 2,…). If you want to get the unique ID, just hover over the stage tab, and the unique ID will be displayed. This may be useful if you want to compare, e.g. results from the Excel sheet (see Data).
Rounds
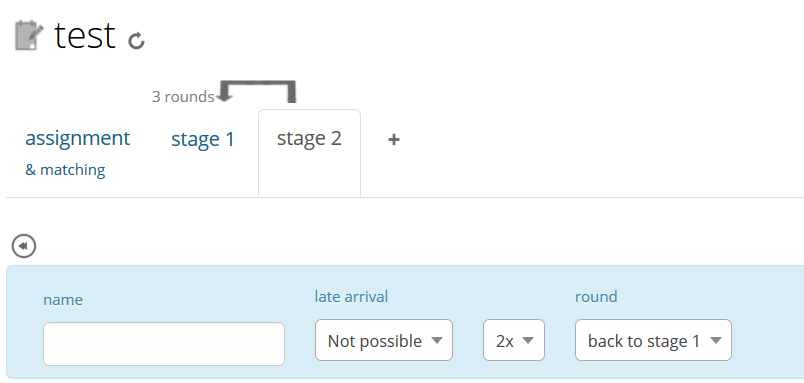
If you want to run one or more stages more than once, you can define loops with a certain number of rounds. You can determine how often you would like to return to a certain stage. E.g. if you want to repeat stages 1 and 2 three times, you have to specify in stage 2 that you want to return two times (2x) to stage 1. With this, stages 1 and 2 are repeated three times, as shown by the arrow above the tabs, because you go through both stages a first time and then two times back to stage 1.
If you set the number to zero times (0x) or if the stage has been run for the predetermined number of times, classEx will continue to the next regular stage.
Note
You should only define one loop per game. Decisions and other variables are stored with the same variable name but with an increasing round number.
Late arrival
You can specify whether participants can arrive late, i.e. if they log in after the game has already started. You can choose for this to be possible, not possible, or only possible in the first round of a game.
Note
If you allow for late arrival in later stages, participants miss the first stages. Make sure that in this case, participants miss nothing which is necessary for later stages (e.g. declaration of variables,…). Assignment and matching are done in the first stage, so you should only allow later arrival if assignment and matching are not necessary.
Note
Matching is done on-the-fly. This means if a subject arrives late (only in the first stage), it will be matched according to your settings.
Move stages
When you create a new stage, this stage will automatically be defined as the next stage. You can move stages by pressing Move stage backward (left) or Move stage forward (right). The order in which the stages are run is always from left to right.
Add stage
You can add a new stage by clicking on Add new stage beside the tabs displaying the different stages or on the top right of the current stage.
Copy stage
You can copy a stage, including all elements and settings of this stage. If you click on copy, the paste symbol  will appear. The left icon
  can undo the copying. The right icon
  pastes the stage after the current stage. You can also copy stages across different games. Just copy the stage, open the new game and paste it there.
Delete stage
You can delete a stage by pressing Delete stage. Deletion can not be reversed.
Define Elements
Each stage consists of one or more elements. Elements are the modules of a stage. A stage has two areas in which you can add elements: participants and lecturer.
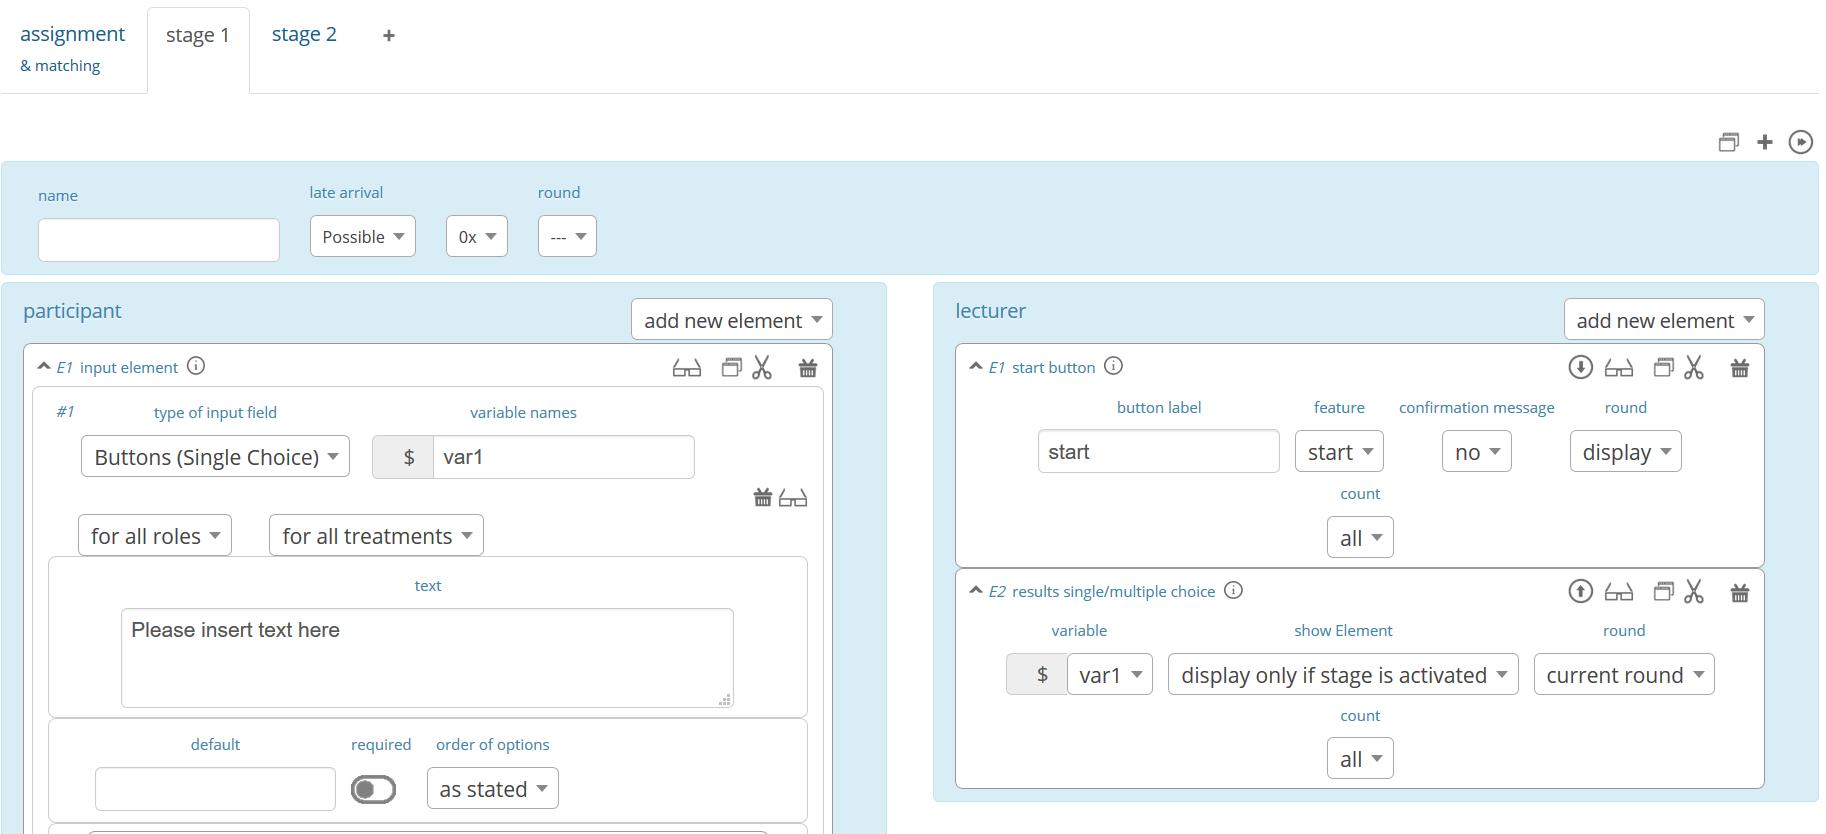
The left side shows the elements for the participant. Elements added here are displayed on the participants’ devices. The program code (so-called subjects programs) added here is run for every single participant.
The right side shows the elements for the lecturer. Elements added here are displayed on the lecturer’s screen in the lecture mode. Program code (so-called globals programs) added here is run once for all participants.
Some elements are the same for participants and lecturers (e.g text boxes), but most elements are different. Typical elements for participants are input elements, program codes, text boxes and winning notifications. Typical elements for lecturers are start buttons, program codes, text boxes and many different result elements.
Note
A full list of all elements can be found in the section Elements.
Note
Elements are always displayed and executed from top to bottom.
Adding elements
You can add an element by clicking on add element and selecting the type of element you want to add. Note that there are different elements for lecturers and participants. After that, you have to choose where you want to place the element. The paste symbol will appear for every possible location of the element. Choose a location for your element by clicking on the corresponding paste element icon or cancel placing the icon by clicking on any do not paste icon . If there are no elements defined yet (for the participant or the lecturer), the element is automatically added to the first place.
Handling elements
All elements share some common characteristics which are described here. The details for every element are described in the section:ref:Elements:Elements.

- Fold element
Each element can be folded to save space on the screen.
- Element number
The elements are numbered (E1, E2, …). This also defines the order of display in a stage. Elements can be moved within a stage with the move element arrows or by cut-and-paste.
- Element type and help
Besides the number of the element, you can see the element type. Clicking on the info button next to the element type leads you to the respective description in this documentation.
- Display condition
If showing the element should be conditional (e.g. not for every role or dependent on other variables), you can specify the display condition for an element in the code line that appears when you click on show display condition. The code will be evaluated as being true or false. Display conditions are defined in PHP. It should only contain comparison and should not end with a semicolon.
$round>2 || ($role==1 & $treatment==2)
You can combine different combinations with the and-operator & and the or-operator ||. The example only displays the element if the round is higher than 2 (so from round 3 on) or if the role is 1 and the treatment is 2 (independent of the round).
- Copy element
You can copy an element by pressing copy element. Then the paste symbol appears on every possible location
. You can copy and paste elements across all stages of the game.- Cut element
You can cut an element by pressing cut element. Then the paste symbol appears on every possible location
. You can copy and paste elements across all stages of the game. This can also be used to order elements instead of moving them up or down with the move element arrows.- Delete element
You can delete the element by pressing delete element. You have to confirm a deletion. After that, a deletion cannot be reversed.
- Groups, treatments and roles boxes
If you have defined groups, treatments or roles (more information about this in the next chapter), a box appears where you can also choose whether the element shall be displayed for all groups, treatments or roles or for special groups, treatments or roles only.
Note
Restricting the display and execution of elements for certain groups, treatments or roles can be done both with the boxes and with the display condition. With the boxes, you can limit the display to one group, role or treatment. With the display condition, you can combine different conditions or allow for multiple groups, roles or treatments.
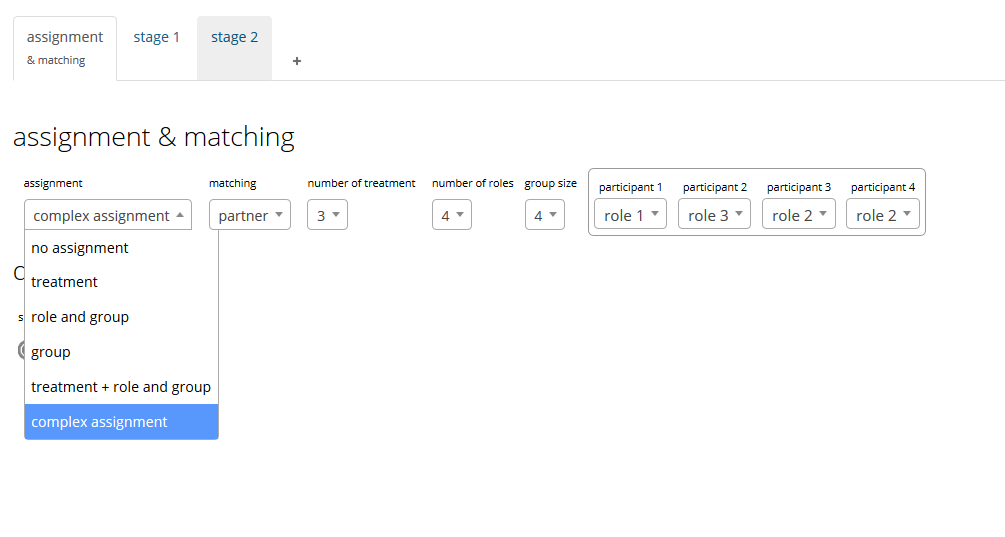
Assignment and Matching
Left to the tab stage 1, you find the tab assignment and matching. Here, you can specify whether you want to assign participants to treatments, groups, roles or a combination of all (complex assignment).
Normally, the total number of participants is not known before the start of the experiment. This requires matching-on-the-fly. After they are logged in, subjects wait in a virtual lobby. Once the experimenter starts the experiment, the assignment of roles and treatments and the matching into groups takes place.
Note
The number of participants may not match the composition of groups of players that a lecturer seeks to assemble. For example, a mismatch would occur with an uneven number of participants in a game in which players must be matched into pairs of two. classEx offers different methods to deal with this. Either the decisions of other participants can be duplicated and matched to excess participants as a clone, or random decisions can be used. The experimenter can specify in the Functions to retrieve variables which method shall be employed. This makes sure that participants always get feedback, which can be important in order to avoid disappointing participants. As a further option, participants with no partner can be excluded from the game. Certainly, cloned or random observations may have to be deleted prior to using data for research.
Available roles
Up to 13 role symbols (and therefore roles) are available (and an additional grey role 0 for no role assignment). Role 1 is shown with a red figure. Role 2 is shown with a green figure and distinguishable by a different form to allow distinction for people who have red–green colour blindness.

These roles are standardized items and are shown in the header of the participant’s page. If you want to display the role figure in a text box, just add role1.png to the text (for role 1). This will be replaced with the respective figure. Make sure that role1.png is followed by a space; otherwise, the replacement will not work.
Assignment at the beginning of a game
classEx allows you to flexibly adapt to an unknown number of participants, meaning that you choose the number of different roles, the number of treatments and the size of groups. classEx then assigns participants automatically. classEx allows lecturers to either set the size of a group (for example, two for a trust game or four for a public goods game), in which case the number of groups is automatically determined at the start of the experiment. Alternatively, an experimenter specifies the number of groups (for example, if each plays a different treatment), in which case their size is determined automatically. Specifically, you have the following available options:
- no assignment
Participants are all assigned to role 0, treatment 0 and group 0.
- treatments
This allows you to assign participants to treatments. A division into treatments will distribute participants evenly over treatments. You can select any number of treatments between 1 and 10. Treatments will be distributed according to arrival in the experiment (e.g. with two treatments, the first player will be treatment 1, the second treatment 2, the third again treatment 1,…). If you have defined groups as well, members of a group will always be assigned to the same treatment.
- role and group
This allows you to assign participants to a number of different roles in the game. Participants will be allocated to role 1, role 2, role 3… alternately. Participants will also be assigned to a group which contains one participant with each role. E.g. if you have defined 3 roles, a group will consist of role 1, role 2 and role 3. If you want to have groups with an asymmetric combination of roles, please use complex assignment.
- group
Allows you to assign participants to groups (all participants will have the same role 0). Groups are filled one after another. You are free to select any group size. The number of groups is determined automatically by classEx.
- treatment + role and group
Allows you to assign both role+group and treatments. It combines the two above options. Members of a group are always assigned to the same treatment.
- complex assignment
Allows you to assign participants to a different number of roles, treatments and groups. Again, members of a group are always assigned to the same treatment.
Note
The so-called between-subject design examines how a controlled variation of the game influences the behavior of different participants. This can be implemented using treatments. The groups in one treatment only interact with participants in their own treatment and never with participants of the other treatment. The game can be adapted for every treatment, for example, by providing different information, altered probabilities of random events or diverse strategic interactions.
Matching
At the beginning of a game, the assigned participants are always matched randomly to roles, treatments and groups. If your game consists of several rounds, you can specify how you want them to be rematched. You can choose from the following options:
- partner
Participants stay in the same groups and keep their roles throughout the entire game.
- random
Participants are randomly assigned to a new role, group and treatment (if specified).
Note
Absolute stranger matching, ensuring that participants never interact with participants they have interacted with before, is not available.
Random matching with constant roles
Random matching with constant roles means randomly matching the subjects into new groups at the beginning of each round, but at the same time keeping the subjects’ roles constant. This is not provided as an option in classEx by default, but can be implemented manually as follows.
The assignment selected must be “role and group”. It is also possible to include treatments. In this case, select complex assignment. The matching method selected should be “partner”.
Note
The provided code only works for groups where each role is only used once. E.g. groups of 3 people need to have roles 1, 2 & 3. It is not possible to use the code for groups with, e.g. twice role 1 and one role 2.
You need to add a globals program in the lecturer field in the first repeated stage of your experiment and a subjects program in the participants field.
Insert the following code in the globals program:
unset($group_nr_a); //clears the array where group numbers are stored in the assignment process

// This gives arrays with the internal participant ID and the role or treatment
$rolesarray = $getRoles();
$treatarray = $getTreatments();
if ($treatarray == null) { //in case only one treatment is selected, everyone is assigned to one array
    foreach($rolesarray as $IDs => $roles) {
        $treatarray[$IDs] = 1;
    }
}


foreach($treatarray as $IDs => $treat) { //in case there are different treatments, an array with IDs and respective roles is created for each treatment
    ${"tr_specific_array_$treat"}[$IDs] = $rolesarray[$IDs];
}

$numberofroles = max($rolesarray);
$numberoftreatments = max($treatarray);


//this for-loop shuffles all the different treatment-specific arrays that have been created and keeps the ID -> role connections
for($z = 1; $z <= $numberoftreatments; $z++) {

    $IDs = array_keys(${"tr_specific_array_$z"});
    shuffle($IDs);
    foreach($IDs as $internalplayerid) {
        $new[$internalplayerid] = ${"tr_specific_array_$z"}[$internalplayerid];
    }
    unset(${"tr_specific_array_$z"});
    ${"tr_specific_array_$z"} = $new;
    unset($new);
    unset($internalplayerid);
    unset($IDs);
}


for ($i = 1; $i <= $numberofroles; $i++) {
    $count[$i] = 1; //Initializing group count per role array
}

//new group numbers are assigned
for($z = 1; $z <= $numberoftreatments; $z++) {

    foreach (${"tr_specific_array_$z"} as $IDs => $roles){

        for ($i = 1; $i <= $numberofroles; $i++) {
            if ($roles == $i) { //If role fits
                $group_nr_a[$IDs] = $count[$i]; //Group assignment to group count
                $count[$i] = $count[$i]+1; //Increase group count for the role
            }
        }
    }
    unset(${"tr_specific_array_$z"});
    unset($IDs);
    unset($roles);
}
Insert the following code in the subjects program:
// reset the ID of the group with the new value generated by the globals program
$resetGroupNr($group_nr_a[$id]);
Note
You can find an example for the implemented code in the repository. The game is called “Assignment”.
Further settings
On the page assignment and matching, you can further choose if the role should be displayed in the header of the participants’ page and if the internal ID of the participant should be displayed there as well.
Additional CSS for participants
If you want to add additional CSS for participants, you can do so by clicking on additional CSS for participants in the top right corner. By clicking on the program box, a CSS editor opens, and you can add custom CSS. The CSS is loaded for every page of the participant.
Parameters
Parameters are global variables that can be adjusted in the lecture mode directly before starting an experiment. You can define parameters to enable adaptation of the game for lecturers without any knowledge of how to edit games. You can then play the same game several times with different parameters. This feature is very useful if you want to introduce some flexibility in the game.
Note
Parameters are initialized at the start of the game. They are read-only. They are the same for all participants.
You can define parameters by clicking on the parameter button in the top bar of the editing mode. Here you can see all defined parameters for the active game, edit them and add new ones. After adding a parameter, you can use it as a global variable in the whole game.
In the editing mode, parameters and their values are shown in the top right corner (if defined). If you display old results in the lecture mode, parameters are shown there as well.
Here is an example with a numeric parameter and a select list.
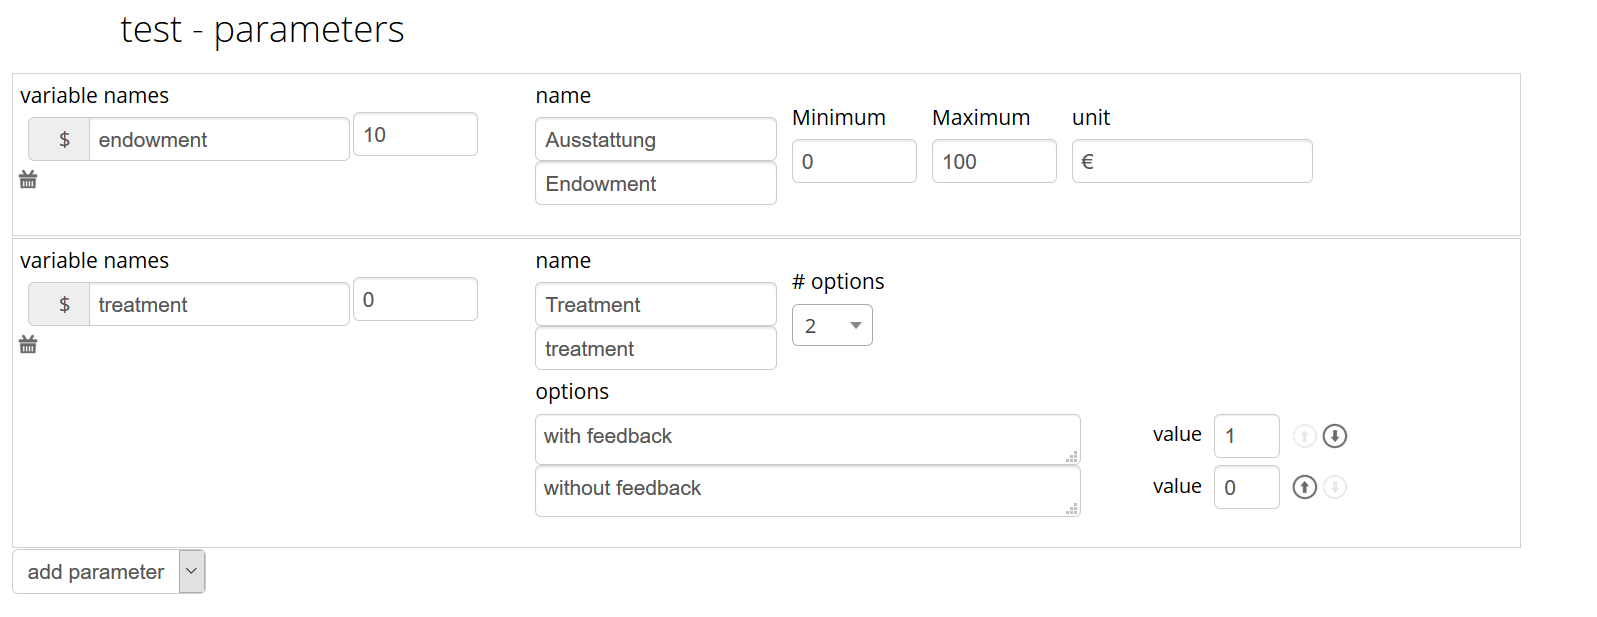
For numeric parameters, you have to define a variable name (here $endowment) and a default value. The default value is used if the lecturer does not change the parameter. On the right-hand side, you can define how the parameters are displayed to the lecturer (when they set the parameters in the lecture mode). They should not be bothered with variable names; therefore, providing an easy name is useful. If the game is implemented in two languages, you can provide two different names. Additionally, you have to provide a minimum and a maximum. You can also provide a unit (e.g. €, meters,…).
For select lists, you have to define a variable name and a default value as well. Also, a name is required. For options, you can specify a label and a respective value.
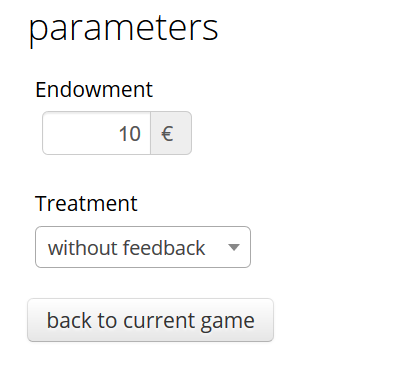
In the lecture mode, the lecturer can then set the endowment and choose from different treatment options as shown in the figure above.
Languages
If you defined a second language in the game settings, all text fields show up twice so that you can enter the text in the two different languages, here German and English.
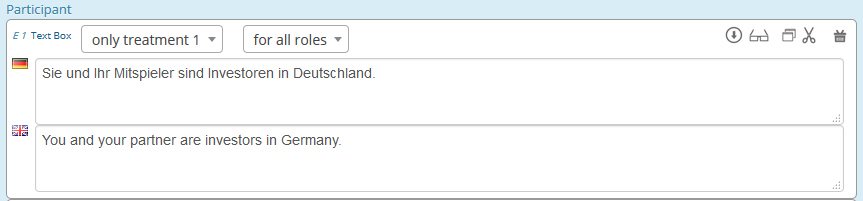
To display only one language in the editing mode, you can click on the flag symbols next to the game name. Then all fields with the respective language are hidden. Note that this does not mean that the language is deactivated when the game is played, but only that you can hide some fields while implementing the game.

For other elements, this function has not been implemented yet. In this case, you need to enter both languages in one text box, separated by $$. For more information, see Text box.